RJ-4230B
FAQs & Troubleshooting |
Using the Communication Settings (for Windows)
To use the Communication settings, please follow the steps below:
-
Open the Printer Setting Tool.
To learn how to open the Printer Setting Tool, see "Using the Printer Setting Tool (for Windows)".
-
Click the [Communication Settings] button.
The [Communication Settings] window appears.
-
Specify or change the settings.
For information on items in the [Communication Settings] window, refer to the following links:
- Settings Dialog Box
- Menu Bar
- General Tab
- Bluetooth Tab
-
Applying Setting Changes to Multiple Printers
-
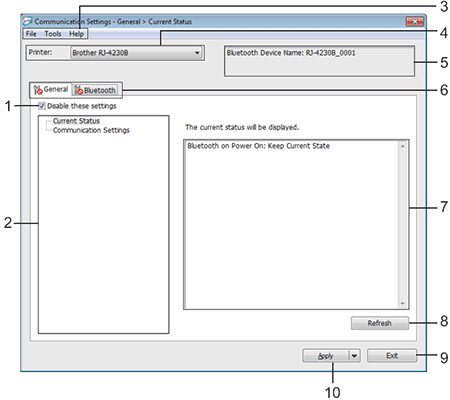
Disable these settings
When this check box is selected, appears in the tab, and the settings can no longer be specified or changed.
Settings in a tab where appears will not be applied to the printer even if [Apply] is clicked. In addition, the settings in the tab will not be saved or exported when the [Save in Command File] or [Export] command is executed.
To apply the settings to the printer or save or export them, make sure you clear the check box. -
Items
When [Current Status] is selected, the current settings appear in the settings display / change area.
Select the item for the settings that you want to change. - Menu Bar
-
Printer
Lists the connected printers. -
Bluetooth device name
Displays the Bluetooth device name. (See Menu Bar.) -
Settings Tabs
Contains settings that may be specified or changed.
If appears in the tab, the settings in that tab will not be applied to the printer.
 -
Settings Display / Change Area
Displays the current settings for the selected item. -
Refresh
Updates the displayed settings with the most recent information. -
Exit
Exits [Communication Settings], and returns to the main window of the Printer Setting Tool.Changes to settings are not applied to printers if you click [Exit] without first clicking the [Apply] button.
-
Apply
Applies the settings to the printer.
To save the specified settings in a command file, select [Save in Command File] from the drop-down list.
The saved command file can be used with the mass storage mode to apply the settings to a printer.
To learn how to use the mass storage mode, see "How do I switch to and use the mass storage mode?"Clicking [Apply] applies all settings in all tabs to the printer. If the [Disable these settings] check box is selected, the settings in that tab are not applied.
-
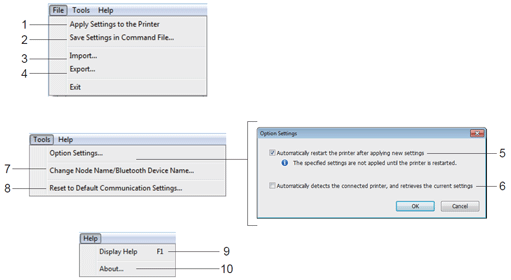
Apply Settings to the Printer
Applies the settings to the printer. -
Save Settings in Command File
Saves the specified settings in a command file.
The file extension is “.bin”.
The saved command file can be used with the mass storage mode to apply the settings to a printer.
To learn how to use the mass storage mode, see "How do I switch to and use the mass storage mode?".- If the [Disable these settings] check box is selected, the settings in that tab are not saved.
- The saved communication settings commands are intended to be used only for applying settings to a printer. To apply the settings to the printer using this command file, use the mass storage mode.
- Take necessary measures to protect saved command files.
- Do not send the command file to a different printer model.
-
Import
Select a Profile to import
Imports the exported file and applies the settings to a printer.
Click [Browse] and select the file you want to import. The settings in the selected file appear in the settings display / change area.- All settings can be imported.
- Only profiles that are compatible with the selected printer can be imported.
-
Export
Saves the current settings in a file.- If the [Disable these settings] check box is selected, the settings in that tab are not saved.
- Exported files are not encrypted.
-
Automatically restart the printer after applying new settings
If this check box is selected, the printer automatically restarts after communication settings are applied.
If this check box is cleared, you must restart the printer manually.When configuring multiple printers, you can reduce the time needed to change settings by clearing this check box. In this case, we recommend selecting this check box when configuring the first printer so that you can confirm that each setting is operating as intended.
-
Automatically detects the connected printer, and retrieves the current settings
If this check box is selected and a printer is connected to the computer, the printer is automatically detected and the printer’s current settings are displayed in the [Current Status] page.If the model of the connected printer is different than that of the printer shown in the [Printer] drop-down list, the settings available on all tabs change to match the connected printer.
-
Change Node Name / Bluetooth Device Name
Allows renaming a Bluetooth device. -
Reset to Default Communication Settings
Returns the communication settings to their factory settings. -
Display Help
Displays the Help. -
About
Displays the version information.
Communication Settings
-
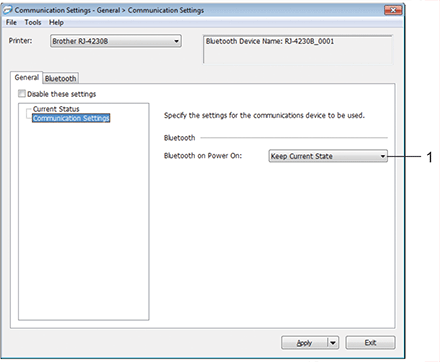
Bluetooth on Power On
Specifies the conditions for connecting via Bluetooth when the printer is turned on.
Select [On by default], [Off by default] or [Keep Current State].
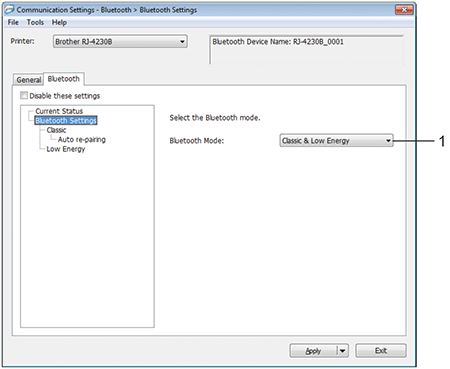
Bluetooth Settings
-
Bluetooth Mode
Set the control mode when Bluetooth is enabled.
Available settings: [Classic & Low Energy], [Classic Only], [Low Energy Only]
Classic
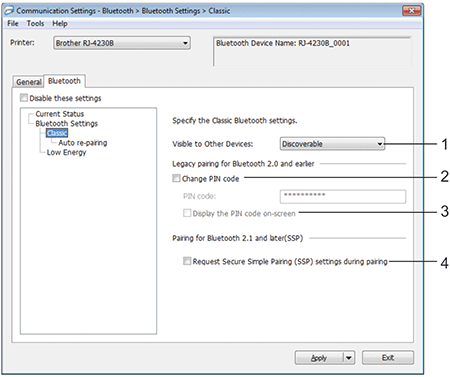
To enhance security, use Secure Simple Pairing (SSP) on both the Bluetooth device (version 2.1 or higher) and the printer.
Select the "Request Secure Simple Pairing (SSP) settings during pairing" or "Pairing requires user confirmation on printer" checkbox.
-
Visible to Other Devices
Allows the printer to be “discovered” by other Bluetooth devices.Available settings: [Discoverable], [Not Discoverable]
-
Change PIN code
If this check box is selected, you can change the PIN code. -
Display the PIN code on-screen
If this check box is selected, your computer displays the PIN by default. -
Request Secure Simple Pairing (SSP) settings during pairing or Pairing requires user confirmation on printer
If this check box is selected when using Classic Bluetooth Mode, it is necessary to perform additional printer key operations to press the (Feed) / OK button in the printer (authentication process) when pairing with devices running Bluetooth Version 2.1 or higher.
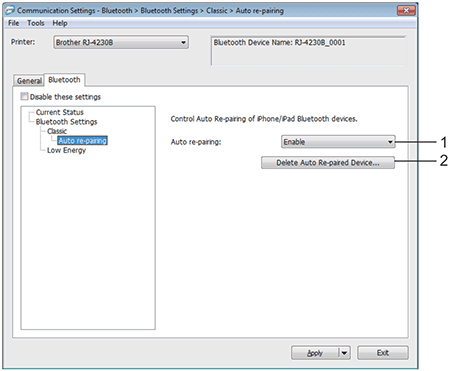
Auto re-pairing
-
Auto re-pairing
Sets whether or not to automatically reconnect to a previously connected iOS device.
Available settings: [Enable], [Disable] -
Delete Auto Re-paired Device
Pressing this button deletes information for auto re-paired devices registered in the printer.
Low Energy
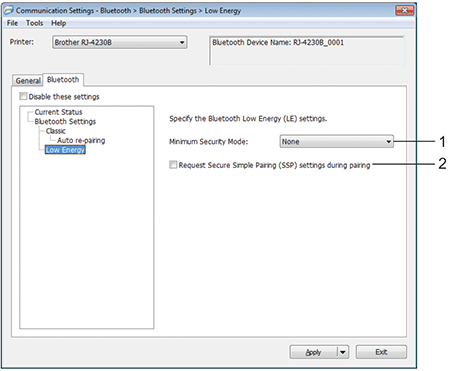
To enhance security, use Low Energy Secure Connections on both the Bluetooth device (version 4.2 or higher) and the printer.
Select "LE Secure Connections" from the "Minimum Security Mode" drop-down list.
-
Minimum Security Mode
Select the minimum security level when using the [Low Energy Only] mode.
Available settings: [None], [Unauthenticated Encryption], [Authenticated Encryption], [LE Secure Connections] -
Request Secure Simple Pairing (SSP) settings during pairing
If this check box is selected when using the [Low Energy Only] mode, additional Printer key operations to press the (Feed) / OK button in the printer (authentication process) are required when pairing with Low Energy compatible devices.
Applying Setting Changes to Multiple Printers
- After applying the settings to the first printer, disconnect the printer from the computer, and then connect the second printer to the computer.
-
Select the newly connected printer from the [Printer] drop-down list.
If the [Automatically detects the connected printer, and retrieves the current settings] check box in the [Option Settings] dialog box is selected, the printer connected with the USB cable is automatically selected. (See Menu Bar.)
-
Click the [Apply] button.
The same settings that were applied to the first printer are applied to the second printer. -
Repeat steps 1 - 3 for all printers whose settings you want to change.
To save the current settings in a file, click [File] - [Export].
The same settings can be applied to another printer by clicking [File] - [Import], then selecting the exported settings file. (See Menu Bar.)
