VC-500W
FAQs & Troubleshooting |
How do I update the printer's firmware?
![]() For Brother Color Label Editor/Color Label Editor 2 App Users
For Brother Color Label Editor/Color Label Editor 2 App Users
![]() For Windows/Mac Users
For Windows/Mac Users
For Brother Color Label Editor/Color Label Editor 2 App Users:
-
Turn on the printer and connect to the internet connected access point/router using Infrastructure mode.
The setup steps differ depending on the status of the Wi-Fi button (LED).- If the Wi-Fi button is lit in blue, Infrastructure mode is already set. Proceed to Step 2.
- If the Wi-Fi button is blinking in blue, press and hold the Wi-Fi button for 2 seconds until it lights in white, and follow the procedure below.
- If the Wi-Fi button is lit in white, follow the procedure below.
- If the Wi-Fi button is not lit, your Wi-Fi® is off. Press and hold the Wi-Fi button for 2 seconds until it lights in Blue. Then press the Wi-Fi button for 2 seconds again until it lights in white, and follow the procedure below.
- Start the application.
-
Color Label Editor:
Tap [Settings] > [Set up a VC-500W Printer] > [W-Fi Setup].
Color Label Editor 2:
Tap [Settings] > [Firmware update] > [Add Printer]. - Follow the displayed instructions to connect your printer to the mobile device using Infrastructure mode.
-
Confirm that the LEDs on the printer do not indicate any error.
Android™:
When the LEDs are all in the following each state, the printer is ready to be updated.
Wi-Fi button  (Lit in blue)
Cassette button  (Lit in white)
Swipe-to-Cut Panel  (Off)
(Off)
Make sure that your printer is connected to the device:
Color Label Editor: Tap [Settings] > [Advanced] > [Get Info] > [Check].
Color Label Editor 2: Tap [Settings] > [Firmware update].
iOS/iPadOS:
Make sure that your printer is connected to the device:
Color Label Editor: Tap [Settings] and then tap [Get Info] of [System Information] > [Get Info] > [Check].
Color Label Editor 2: Tap [Settings] > [Firmware update]. -
When [Install] is displayed on the screen, tap the screen to update the application.
If [Install] is not displayed on the screen, the application is the latest version.
-
Turn on the printer and connect to the internet connected access point/router using Infrastructure mode.
The setup steps differ depending on the status of the Wi-Fi button (LED).- If the Wi-Fi button is lit in blue, Infrastructure mode is already set. Proceed to Step 2.
- If the Wi-Fi button is blinking in blue, press and hold the Wi-Fi button for 2 seconds until it lights in white, and follow the procedure below.
- If the Wi-Fi button is lit in white, follow the procedure below.
- If the Wi-Fi button is not lit, your Wi-Fi is off. Press and hold the Wi-Fi button for 2 seconds until it lights in blue. And press the Wi-Fi button for 2 seconds again until it lights in white, and follow the procedure below.
- Select the printer name (Brother VC-500W [the last 4 digits of the serial number]) from the detected wireless networks, and connect the computer and printer using Wireless Direct mode.
- Open your browser window, input “192.168.0.1” in the address bar of the browser and press the [Enter] key.
- Select your desired language.
- Click “NETWORK WI-FI SETUP”.
- Scroll the sidebar, and select SSID of your access point. (If your Wi-Fi network doesn't appear/connect directly to a specified access point, click the button "If your Wi-Fi network’s name is not displayed, click here to enter your network ID and password", enter the Wi-Fi name and password.)
- Enter the password, and click [Connect].
-
When the screen below is displayed, Infrastructure mode setup is complete. Make sure that the Wi-Fi button is lit in blue.
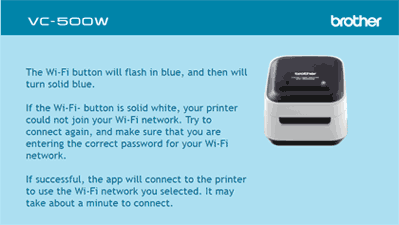
For the Infrastructure mode setup method, you can also see the Wireless Setup Guide in the [Manuals] section of this website.
-
Input the address below in the address bar of your browser window and press the [Enter] key.
- Mac: http://vc-500w[the last 4 digits of the serial number].local
-
Windows: http://brvc-500w-[the last 4 digits of the serial number]
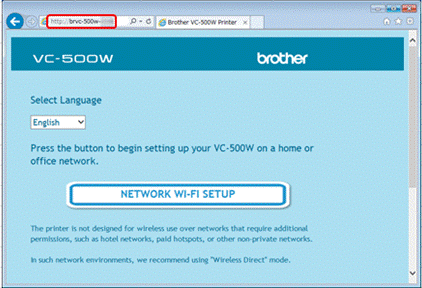
-
For Mac:
You can open Printer Web Page from the following window:
[System Settings]/[System Preferences] > [Printers & Scanners] > [Select VC-500W] > [Options & Supplies...] > [Show Printer Web Page...] -
For Windows:
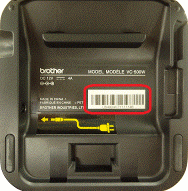
If http://brvc-500w-[the last 4 digits of the serial number] address does not work on your PC, there are possibility that NetBIOS is disabled or blocked on your PC. Please change the setting of your PC to enable NetBIOS or you can also download the latest Bonjour Service from Apple website, and try http://vc-500w[the last 4 digits of the serial number].local address on your browser. - The serial number is indicated on the bottom of your printer as illustrated below.
-
Click [AirPrint Options].
If the firmware update menu does not appear:
a. Click [Admin Login] and type your password in the password field.b. Click [Select Updated Firmware] and select the firmware you want to update from the drop-down list.If you have not set your own password, type the default password located on the bottom of the printer and preceded by "Pwd".
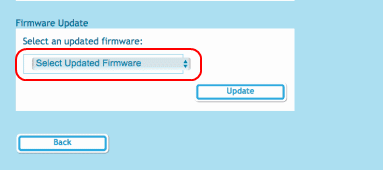
For more information, see [IMPORTANT – Network Security Notice: Default Login Password Change] on the [Manuals] page. -
Confirm that each LED on the printer does not indicate any error.Click [Update] and wait until the printer restarts.
When the LEDs are all in the following each state, the printer is ready to be updated.
Wi-Fi button  (Lit in blue)
Cassette button  (Lit in white)
Swipe-to-Cut Panel  (Off)
(Off)
If your home or office network security firewall prevents the printer from direct access to the internet, or blocks downloads of certain zip/tar/rar files, this firmware update method may not work. Please contact your network administrator for further assistance.
