MFC-9970CDW
FAQs & Troubleshooting |
Setup and use Brother PC-FAX receiving
If you turn on the PC-fax receive feature your machine will store received faxes into memory and send them to your PC automatically. You will then be able to view the received faxes on the PC.
Even if you have turned off your PC (at night or on the weekend, for example), your machine will receive and store your faxes in its memory. The LCD will show the number of stored faxes received, for example: PC FAX Msg:001.
To setup PC-fax receiving you must turn on PC-fax receiving at the machine and through the Brother software.
Click the link for steps:
-
ENABLE PC-FAX RECEIVING WITHIN THE SOFTWARE
-
ENABLE PC-FAX RECEIVING WITHIN THE BROTHER MACHINE
-
CONFIGURE THE PC-FAX RECEIVING SETTINGS
-
CONFIGURE THE NETWORK PC-FAX RECEIVING SETTINGS
- VIEW NEW PC-FAX MESSAGES
ENABLE PC-FAX RECEIVING WITHIN THE SOFTWARE:
-
On the computer, run the Brother PC-FAX Receive software.
(Windows 7)
Click Start => (All) Programs => Brother => [model name] => PC-Fax Receiving => Receive.
(Windows 8)-
On the Start screen, click
 . If
. If  is not on the Start screen, right-click somewhere on an empty spot, and then click, All Apps from the bar.
 - Click Brother Utilities.
- Choose your model name from the pulldown list.
- Choose PC-FAX Receive and then click Receive.
- Click Start => (All apps =>) Brother => Brother Utilities.
- Choose your model name from the pulldown list.
- Choose PC-FAX Receive and then click Receive.
-
On the Start screen, click
-
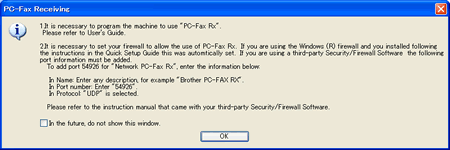
If you receive a statement about how to configure PC-Fax Receiving, you may read the instructions, and then click OK.

-
The Brother PC-fax receiving icon will now appear in your Windows Task Tray indicating that Brother PC-Fax Receiving is active.

ENABLE PC-FAX RECEIVING WITHIN THE BROTHER MACHINE:
*If your Brother machine has a touchscreen, please follow the steps under "For touchscreen models" below.
-
Press MENU and choose Fax => Remote Fax Opt => Fwd/Page/Store or Forward/Store.
-
Press the UP OR DOWN ARROW key to choose PC FAX RECEIVE and press OK.
-
You will receive a message advising you to start the program on the PC. Press OK.
-
If prompted, press 1 (Change) or 2 (Exit).
-
Press the UP OR DOWN ARROW key to choose where the faxes should be sent.
-
If the machine is connected through USB choose USB and press OK.
- If the machine is installed over a network choose the computer's name. Once you have made your selection, press OK.
-
If the machine is connected through USB choose USB and press OK.
-
Press the UP OR DOWN ARROW key to choose BACKUP PRINT: ON or OFF. Once you have made your selection, press OK.
-
BACKUP PRINT: ON = The Brother machine will also print the fax so you will have a printed copy.
- BACKUP PRINT: OFF = The Brother machine will not print a copy of the received fax.
-
BACKUP PRINT: ON = The Brother machine will also print the fax so you will have a printed copy.
- Press the STOP/EXIT key.
-
Press Menu on the LCD screen.
-
Press the UP OR DOWN ARROW key to display FAX and press FAX.
-
Press the UP OR DOWN ARROW key to display SETUP RECEIVE and press SETUP RECEIVE.
-
Press the UP OR DOWN ARROW key to display FWD/PAGE/STORE or FORWARD/STORE and press FWD/PAGE/STORE or FORWARD/STORE.
-
Press PC FAX RECEIVE.
-
You will receive a message advising you to start the program on the PC. Press OK.
-
Press the UP OR DOWN ARROW key to choose where the faxes should be sent.
-
If the machine is connected through USB choose USB and press OK.
- If the machine is installed over a network choose the computer's name. Once you have made your selection, press OK.
-
If the machine is connected through USB choose USB and press OK.
-
Press BACKUP PRINT: ON or BACKUP PRINT: OFF.
-
BACKUP PRINT: ON = The Brother machine will also print the fax so you will have a printed copy.
- BACKUP PRINT: OFF = The Brother machine will not print a copy of the received fax.
-
BACKUP PRINT: ON = The Brother machine will also print the fax so you will have a printed copy.
- Press the STOP/EXIT key.
CONFIGURE THE PC-FAX RECEIVING SETTINGS:
-
On the computer, right click on the PC-Fax icon
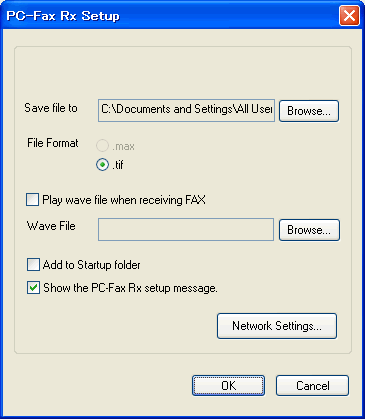
 and left click on PC-fax RX Setup. The PC-Fax RX Setup dialog box appears.

-
In the Save File To field, click the BROWSE button if you want to change the path where PC-Fax files are saved.
-
In the File Format section, choose the extension you want as the received document format. The default format is .tif.
-
To play a wave file (audio file) when receiving a fax check Play Wave File When Receiving A Fax. Click the BROWSE button to locate the wave file you want to play.
-
To automatically start the PC-Fax receiving software when you start your computer, click the box next to Add To Startup Folder.
- Click OK to save your settings and exit the dialog box.
CONFIGURE THE NETWORK PC-FAX RECEIVING SETTINGS:
The settings to send received faxes to your computer were automatically configured during the installation of MFL-Pro Suite. If you wish to change the network PC-FAX Receiving settings, follow the steps below:
-
On the computer, right click on the PC-Fax icon
 and left click on PC-fax RX Setup.
-
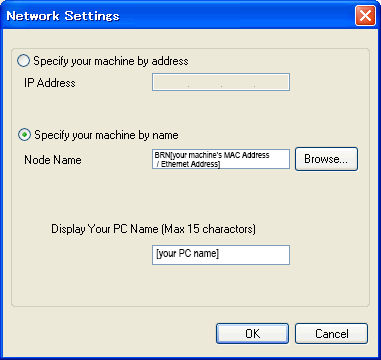
Click the NETWORK SETTINGS button. The Network Settings dialog box will open.

-
Choose Specify The IP Address or Specify The Name Of Your Machine.
-
Enter the IP address or Node Name of your machine.For Node Name, you can click the BROWSE button and choose your Brother machine from the units listed.
-
Under Display Your PC Name, you can specify the PC name that will appear on the display of the machine. To change the name, enter the new name in field.
- Click OK.
-
Each time your PC is receiving a PC-FAX, the icon will alternate between
 and
and  . Once the PC-Fax has been received, the icon will change to
  . This
  icon will change to
  once the received fax has been viewed.
-
To view faxes that have been received to the computer double click the
 icon on the PC Task Tray.
-
Open the Fax Received folder.
- Double-click any new faxes to open and view them.
