HL-2270DW
FAQs & Troubleshooting |
The printer prints unexpectedly or it prints garbage data.
Check the following 8 points.
NOTE: The screens may differ depending on operating system being used and your Brother machine.
- Make sure that the printer cable is not too long. We recommend that you use a USB cable that is no longer than 2 meters (6.5 feet). If you use the USB cable that is longer than 2 meters (6.5 feet), change it to the shorter USB cable and try again.
- Make sure that the printer cable is not damaged or broken. If so, change it to the new one and try again.
- If you are using an interface-switching device, remove it. Connect your computer directly to your printer, and then try again.
-
Check if the correct printer driver is chosen.
For Windows users:
NOTE: The steps and screens may differ depending on the operating system being used.-
Open the "Printing Preferences" dialog.
Please refer to the instructions, "Change the printer driver settings (For Windows)". -
Check the printer driver name.
If your printer name appears in Printing Preferences dialog, the correct printer driver is chosen.
If not, reinstall the correct printer driver referring to Quick Setup Guide that is available on the Manuals section. To go to the Manuals section, click Manuals link on this page.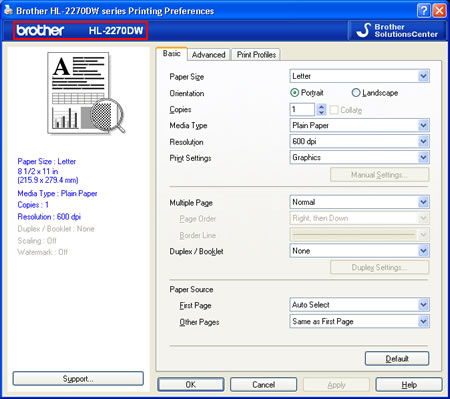
For Macintosh users:
NOTE: The steps and screens may differ depending on the operating system being used.-
Click the Apple icon and open the System Preferences.
-
Click the Print & Fax, Print & Scan or Printers & Scanners icon.
The Print & Fax, Print & Scan or Printers & Scanners window will be displayed.
-
[Mac OS X 10.4 users]
-
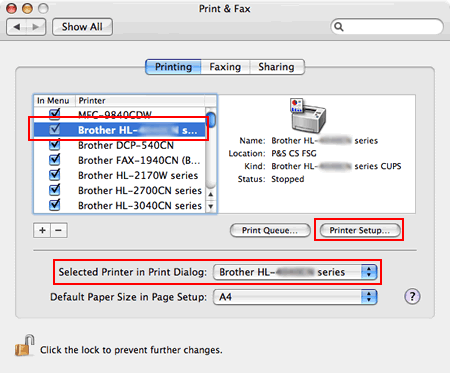
Choose your printer name in the left section. Make sure your printer name appears next to the Selected Printer in Print Dialogue. If not, choose your printer name.
-
Click Printer Setup.
-
Choose Printer Model from the pull-down menu and check the printer driver name.
If the printer driver name matches your printer name, the correct printer driver is chosen.
If not, reinstall the correct printer driver referring to Quick Setup Guide that is available on the Manuals section. To go to the Manuals section, click Manuals link on this page.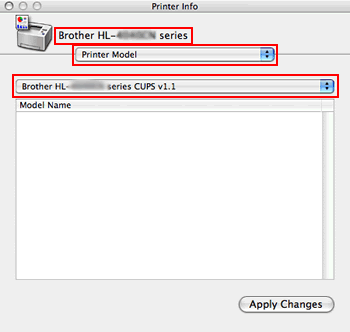
-
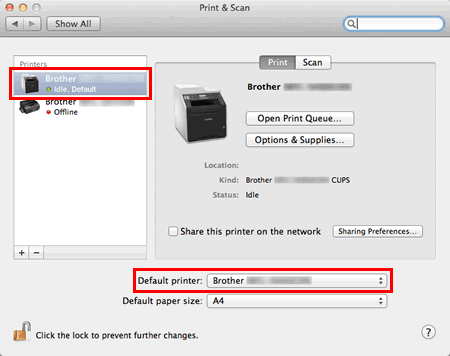
Choose your printer in the left section. Make sure your printer name appears next to the Default Printer. If not, choose your printer name.
-
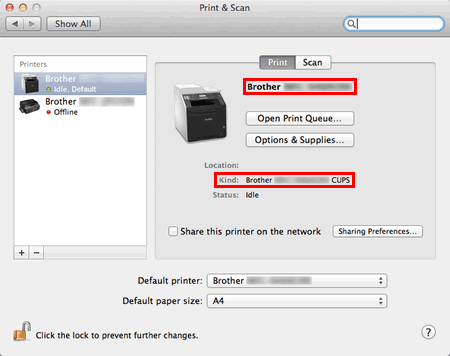
Compare the printer driver name of red line below.
If the printer driver name matches your printer name, the correct printer driver is chosen. If not, reinstall the correct printer driver. Go to the Downloads section of this website to install the latest drivers.
-
Choose your printer name in the left section. Make sure your printer name appears next to the Selected Printer in Print Dialogue. If not, choose your printer name.
-
Open the "Printing Preferences" dialog.
- Make sure that the printer is not connected to the same port that is also connected to a storage device or scanner. Remove all other devices and connect the printer to the port only. Try again.
-
Try resetting the printer to factory default. To perform a factory reset, please follow these instructions:
- Check that the front cover of the printer is closed. Turn OFF the power switch on the right side of the printer.
- Press and hold the GO button, and keep holding it down, as you turn on the power switch. The GO button is located on the top left side of the printer below the LEDs.
- Keep the GO button pressed down until all the LEDs light up and the Ready LED turns off. Release the GO button. Make sure that all the LEDs turn off.
- Press the GO button 10 times. The Ready LED will flash while the printer is reset. After the printer is reset the Ready LED will be lit.
If you use the printer with the network connection, please configure the network setting again after resetting the printer to a factory default.
-
(Windows only)
Check that the appropriate printer driver is selected as Set as Default. Check also that the correct printer port is set for the selected printer driver as follows:-
Open the printer folder.
(Windows 7)
Click Start => Devices and Printers
(Windows 8 / Windows 10)- Open the Control Panel. (Click here to see how to open the Control Panel.)
- Click Hardware and Sound => Devices and Printers
Make sure your Brother machine is selected to print in your application. -
(Windows 10 or earliler)
Verify that the Brother printer is set as default. This is especially important if you use the print icon to print from within applications. If the Brother printer is set as the default printer, it will have a check mark in front of the icon. To set your Brother printer as the default printer, right-click on the Brother printer and select Set As Default (Printer).
-
Open the printer properties.
(Windows Vista)
Right-click on the Brother driver and left click on Properties.
(Windows 7 / Windows 8 / Windows 10)
Right-click on the Brother driver and left click on Printer properties.
(Windows 11)- Click Start > Settings > Bluetooth & devices > Printers & scanners.
- Select your Brother machine, and then click Printer properties.
If you see the Change Properties button at the bottom left of the dialog box, click the Change Properties button before changing the settings.
-
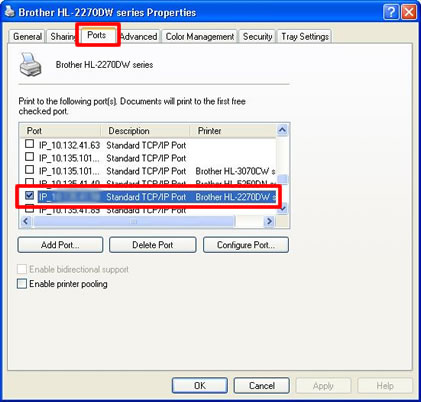
Click the Ports tab. Verify the correct port is selected (USB if using a USB cable). Remember to click Apply if you select another port.
-
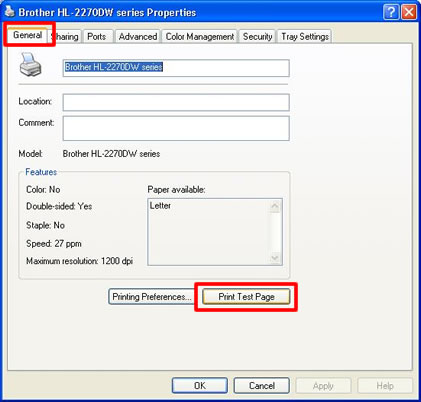
Click the General tab and Print Test Page button. The Windows test page should now print.
-
Open the printer folder.
-
If the printer still prints garbage, try a new USB cable.
Content Feedback
To help us improve our support, please provide your feedback below.
