Innov-is NV2700
FAQs & Troubleshooting |
How to adjust the thread tension
You may need to change the thread tension, depending on the fabric and thread being used.
To achieve attractive results when sewing your project, correct tension is an important point. Too much or too little tension will weaken your seams or cause puckers on your fabric.
Correct thread tension
The upper thread and the bobbin thread should cross near the center of the fabric.
Only the upper thread should be visible from the right side of the fabric, and only the bobbin thread should be visible from the wrong side of the fabric.
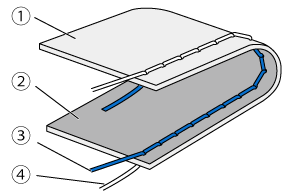 |
(1) Wrong side of fabric (2) Right side of fabric (3) Upper thread (4) Bobbin thread |
Adjusting the thread tension
- If the upper threading and lower threading are incorrect, the thread tension cannot be adjusted correctly, even by turning the upper tension-control dial. Check the upper threading and lower threading first, and then adjust the thread tension.
- If the needle is bent or the tip of the needle is broken or dull, it is not possible to set the correct thread tension. Check the needle, and then replace the needle if it is bent or its tip is broken or dull.
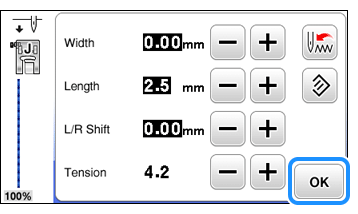
The upper thread tension is changed using the manual adjustment screen.
-
Sew trial stitches using thread and scrap fabric that are the same as those used for your project.
-
Check the sewing results. If necessary, adjust the thread tension. Refer to the procedure below section.
- Adjust the thread tension until the proper tension is achieved while checking the sewing results with trial sewing.
For the trial sewing, use a piece of fabric and thread that are the same as those used for your project.
Since the results differ depending on the type of stitching and the number of layers of fabric sewn, perform the trial sewing under the same conditions that will be used with your project.
Upper thread is too tight
If the bobbin thread is visible from the right side of the fabric, the upper thread is too tight.
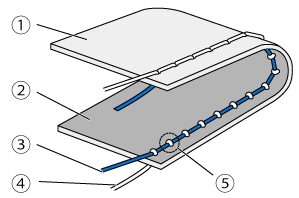 |
(1) Wrong side of fabric (2) Right side of fabric (3) Upper thread (4) Bobbin thread (5) The bobbin thread is visible from the right side of the fabric. |
If the bobbin thread was incorrectly threaded, the upper thread may be too tight.
In this case, refer to "How do I set the bobbin ?" and rethread the bobbin thread.
How to adjust the thread tension
-
Press
 (Manual adjustment key) in the utility stitch screen to display the manual adjustment screen.
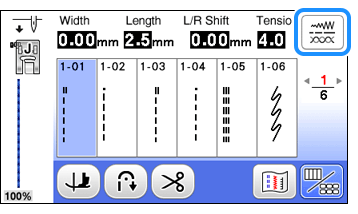
-
Adjust the value of tension by pressing
 at the item [Tension] to loosen the upper thread tension.
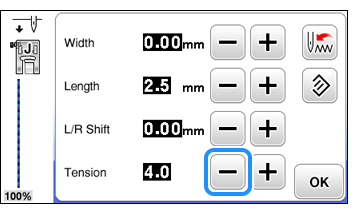
-
After changing the settings, press "OK" to return to the utility stitch screen.
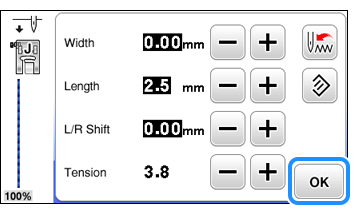
Upper thread is too loose
If the upper thread is visible from the wrong side of the fabric, the upper thread is too loose.
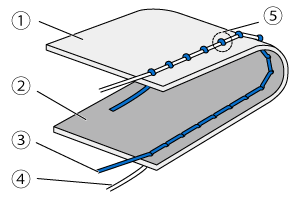 |
(1) Wrong side of fabric (2) Right side of fabric (3) Upper thread (4) Bobbin thread (5) The upper thread is visible from the wrong side of the fabric. |
If the upper thread was incorrectly threaded, the upper thread may be too loose.
In this case, refer to "How do I thread the machine ?" and rethread the upper thread.
How to adjust the thread tension
-
Press
 (Manual adjustment key) in the utility stitch screen to display the manual adjustment screen.

-
Adjust the value of tension by pressing
 at the item [Tension] to tighten the upper thread tension.
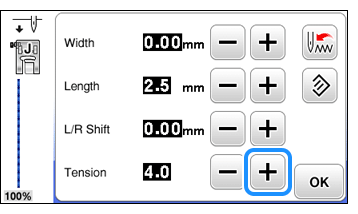
-
After changing the settings, press "OK" to return to the utility stitch screen.
