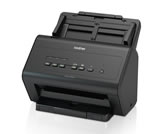
ADS-3000N
FAQs & Troubleshooting |
Scan multiple pages into one file instead of each scan being saved as a separate file.
Click the link below for the operating system (OS) you are using.
Windows
Below are the file types supporting multi-page documents. You must select one of them as the File Type on the scan settings dialog box which appears when scanning.
- TIFF Multi-Page (*.tif)
- PDF Multi-Page (*pdf)
- PDF/A Multi-Page (*pdf)
- High Compression PDF Multi-Page (*.pdf) *1
- Secure PDF Multi-Page (*.pdf)
- Searchable PDF Multi-Page (*.pdf)
- XML Paper Specification (*.xps) *2
- Microsoft Office Word (*.docx)*3
- Microsoft Office PowerPoint (*.pptx)*3
- Microsoft Office Excel (*.xlsx)*4
*1: In order to save the document as a High Compression PDF, you must set the Resolution to 300 x 300 dpi and Scan Type to True Grey or 24 bit Color.
*2: Available for Windows Vista or later, or when using applications which support XML Paper Specification files.
*3: Only available for certain models when these applications are installed onto PCs.
*4: Only available for certain models.
NOTE: The screens may differ depending on operating system being used and your Brother machine.
Click the link below for the ControlCenter you are using to see more details:
If you want to scan more pages than the maximum ADF capacity, we recommend using the Advanced Mode.
Home Mode
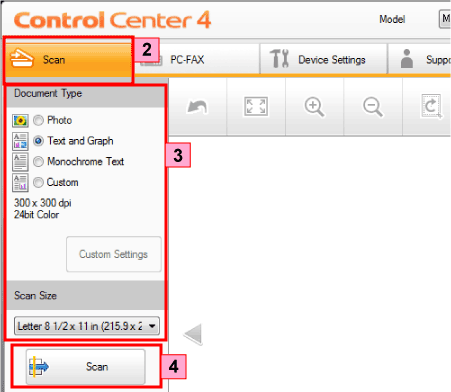
- Place your document, face down, top edge first in the ADF.
- Click the Scan tab.
- Select the Document Type and Scan Size.
-
Click Scan. The machine starts scanning.
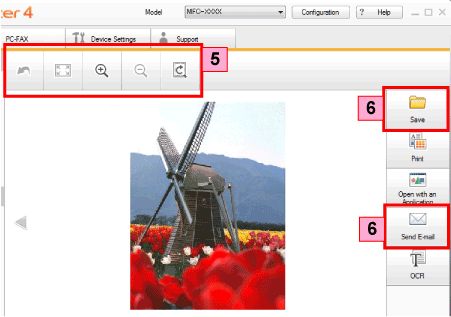
- The scanned image appears in the image viewer. Confirm and edit (if necessary) the scanned image.
-
Click Save or Send E-mail.
-
The settings dialog appears. Select the file type supporting multi-page documents from the File Type drop-down list and then click OK. (Click here to see the file types supporting multi-page documents.)
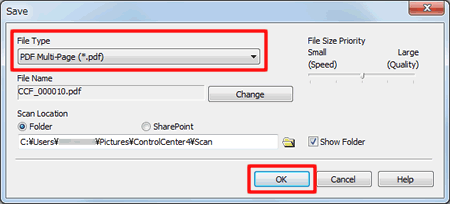
* The dialog may differ depending on your choice in Step 6.
Advanced Mode
- Place your document, face down, top edge first in the ADF.
-
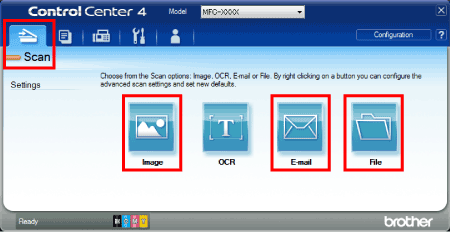
Click the Scan tab, and then click the type of scan you require (Image, E-mail, or File).
-
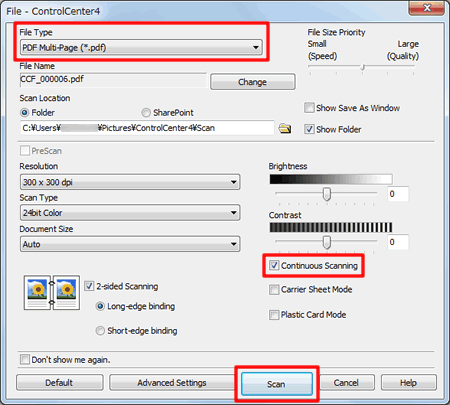
The scan settings dialog appears.
- Select the file type supporting multi-page documents from the File Type drop-down list. (Click here to see the file types supporting multi-page documents.)
- Check the Continuous Scanning box. (Using this option, you can scan more pages than the maximum ADF capacity.)
-
Click Scan. The machine starts scanning.
* The dialog may differ depending on your choice in Step 2.
Macintosh
Below are the file types supporting multi-page documents. You must select one of them as the File Type on the scan settings dialog box which appears when scanning.
- TIFF Multi-Page (*.tif)
- PDF (*pdf)
- High Compression PDF (*.pdf) *1
- Secure PDF (*.pdf)
- Searchable PDF (*.pdf)
- Microsoft Office Word (*.docx)*2
- Microsoft Office PowerPoint (*.pptx)*2
*1: In order to save the document as a High Compression PDF, you must set the Resolution to 300 x 300 dpi and Scan Type to True Grey or 24 bit Color.
*2: Only available for certain models.
NOTE: The screens may differ depending on operating system being used and your Brother machine.
- Place your document, face down, top edge first in the ADF.
-
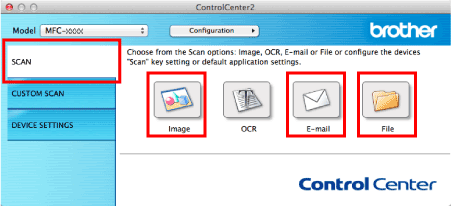
Click the SCAN tab, and then select the type of scan you require (Image, E-mail, or File).
-
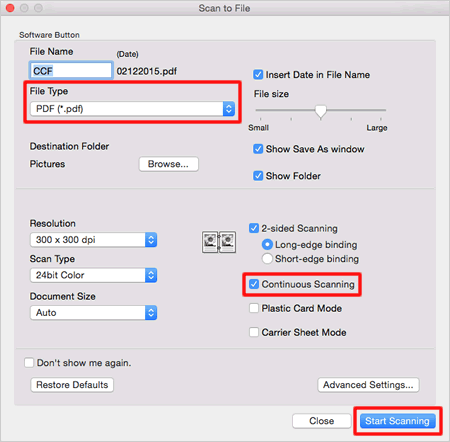
The scan settings dialog appears.
- Select the file type supporting multi-page documents from the File Type drop-down list. (Click here to see the file types supporting multi-page documents.)
- Check the Continuous Scanning box. (Using this option, you can scan more pages than the maximum ADF capacity.)
-
Click the Start Scanning. The machine starts scanning.
* The dialog may differ depending on your choice in Step 2.
