MFC-210C
FAQs & Troubleshooting |
How can I improve poor print quality?
Cleaning the four color print heads (black, cyan, magenta and yellow), adjusting the vertical alignment and/or replacing the ink cartridges may improve the print quality. To identify which print heads need to be cleaned and if the alignment needs to be set, print the Print Quality Test Sheet by following the steps listed below:
Checking the print quality:
-
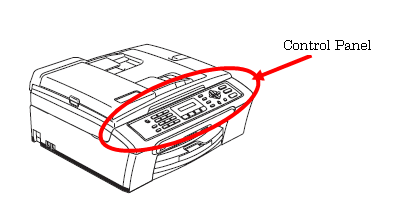
Press the Ink or Ink Management key on the control panel of the machine.
NOTE: Illustration shown below is from the representative product and may differ from your Brother machine.

-
Press the up or down navigation key to select TEST PRINT and press Menu/Set or Set.
-
Press the up or down navigation key to select PRINT QUALITY and press Menu/Set or Set.
-
Press Color (Colour) Start. The machine begins printing the Print Quality Test Sheet.
-
By reviewing this Test Sheet, you can determine if the print quality needs improvement.
-
Closely examine the print quality of the four color blocks that are formed by short diagonal lines on the Test Sheet.
If all lines are clear and visible, press 1 (YES) and press Stop/Exit.
If you can see missing short lines, press 2 (NO) and go to Step 7.
-
The display will then ask you if the print quality is OK for black and three colors. Press 2 (NO) for black or three colors with the problem.
-
The display will then show START CLEANING? 1.YES 2. NO.
Press 1 (YES) and the machine will start cleaning the color ink cartridges.
-
After the cleaning is finished, press Color (Colour) Start. The machine will print another Print Quality Test Sheet.
-
If you can see missing short lines in any of the four color blocks press 2 (NO) and repeat the quality check and cleaning process. Repeat this procedure at least 5 times if print quality remains a problem. If short lines are still missing after the fifth cleaning and test print, replace the necessary ink cartridges. If the print quality of the 4 color blocks is OK, press 1 (YES).
Setting the Alignment:
-
Press the Ink or Ink Management key on the control panel.
-
Press the up or down navigation key to select TEST PRINT and press Menu/Set or Set.
-
Press the up or down navigation key to select ALIGNMENT and press Menu/Set or Set.
-
Press Black (Mono) Start or Color (Colour) Start. The machine begins printing the Alignment Check Sheet.
-
By reviewing this Test Sheet, you can determine if the alignment needs adjustment.
-
Examine the 600 DPI and 1200 DPI test prints on the Alignment Check Sheet. If the number 5 sample of both the 600 DPI and 1200 DPI most closely matches the 0 sample, press 1 (YES).
If one of the other samples is a better match for the 0 sample, press 2 (NO). The display will then prompt you to select the sample that most closely matches the 0 sample for 600 DPI and then 1200 DPI.
- Press Stop/Exit.
For instructions on replacing the ink cartridges, please click here.
Cleaning the print head:
Do NOT clean the print head by touching it with your hand or a cloth.
-
Press Ink or Ink Management key on the control panel of the machine.
-
Press 1 to choose 1.CLEANING.
-
Press the up or down navigation key to choose the Black, Color or All you want to clean, and then press Menu/Set or Set.
The machine will clean the print head automatically. When cleaning is finished, the machine will go back online automatically.
If you clean the print head at least five times and the print has not improved, please contact Brother Customer Service from "Contact Us".
