DCP-T520W
FAQs & Troubleshooting |
Refill Ink
Follow the steps below to refill the ink tanks:
NOTE: Illustrations shown below are from a representative product, and may differ from your Brother machine.
Make sure to confirm the actual amount of remaining ink visually by looking through the window (1) of the ink tank. If the remaining ink level is at or below the lower line (2) under the minimum fill mark, refill the ink tank.

The ink below the lower line is necessary to prevent air from drying out and damaging the print head assembly.
Refill the ink tank when the remaining ink level is at or below the lower line.
If ink gets into your eyes, rinse them with water immediately. If left as it is, it may cause red eye or mild inflammation. In case of any abnormality, consult your doctor.
-
We recommend using genuine Brother supplies to ensure stable print quality and performance. Although not all non-genuine supplies may cause quality issues, using non-Brother supplies or refilling ink cartridges with third party ink, may adversely affect print quality or cause the machine to malfunction. The Brother limited warranty does not apply to any problem caused by the use of third party supplies.
-
The color ink run out of ink even though you never or rarely print in color.
> Click here to see information for it.
-
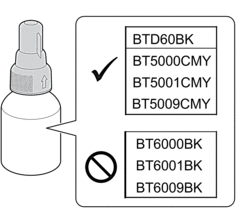
Check the ink bottle model name on the label. Using the incorrect ink may cause damage to the machine.
-
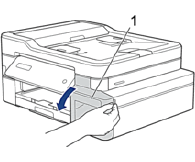
Open the ink tank cover (1).
-
Remove the ink tank cap for the color you want to refill, and place it on the back of the cover, as shown.

Be careful to avoid touching any ink when handling the ink tank cap.
-
Remove the ink bottle cap, remove the film from the ink bottle, and then replace the cap.

- Replace the ink bottle cap tightly. Otherwise, the ink may leak.
- DO NOT shake the ink bottles. If ink stains your skin or clothing, wash with soap or detergent at once.
-
Remove the nozzle cap, as shown.

-
Make sure that the color of the ink tank cap matches the ink color you want to refill.
Keep the nozzle close to the ink tank opening and insert the bottle nozzle firmly into the ink tank so that the ink does not spill.

To fill the ink tank faster, insert the bottle nozzle firmly into the ink tank so that the arrow mark shown on the ink bottle in the illustration is up.

-
The bottle is self-standing, and the ink fills automatically until the bottle is empty or until the ink reaches the maximum fill mark line.
To fill the ink tank faster, squeeze the bottle on both sides.
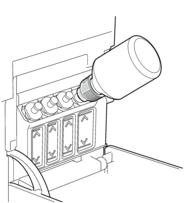
Be careful not to fill the ink past the upper line above the maximum fill mark.
- Be careful not to spill any ink when you refill the ink tank.
- Refill with all of the ink in the bottle, if it does not exceed the upper line.
-
Keep the nozzle close to the ink tank opening and turn the nozzle up and remove the bottle from the ink tank so that the ink does not spill.
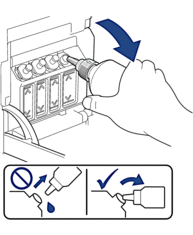
-
Replace the nozzle cap.

- If any ink remains in the ink bottle, seal the cap tightly and store the ink bottle upright on a level surface in a cool, dark place.
- Avoid tilting the ink bottle or storing it on its side; it may leak.
-
Reattach the ink tank cap.
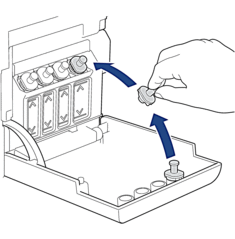
- Repeat these steps for each ink tank you want to refill.
- Close the ink tank cover.
When you open and close the ink tank cover, a message may appear on the machine's display to verify whether the ink tanks were refilled.
- If you refilled the ink tanks, press the Up arrow key (Yes), and press the Up arrow key (Yes) to reset the ink dot counter for the refilled colors.
- If you did not refill the ink tank, be sure to press the Down arrow key (No).
- If you accidentally mix the colors by filling the wrong ink tank, contact Brother customer service or your local Brother dealer.
- If you have opened an ink bottle, use it within six months. Use unopened ink bottles by the expiration date written on the bottle package.
