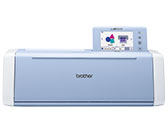
SDX1200
FAQs & Troubleshooting |
Instructions for sending patterns created in CanvasWorkspace to the cutting machine for cutting or drawing.
There are 2 CanvasWorkspace applications that allow you to create and edit cutting or drawing pattern data on a Brother cutting machine.
For CanvasWorkspace, go to CanvasWorkspace .
You can download the CanvasWorkspace from the Downloads section. Click here to visit the download page.
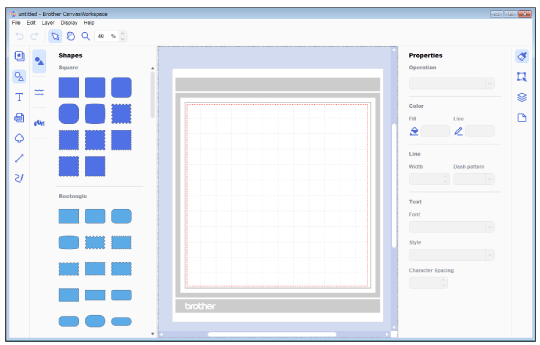
For CanvasWorkspace (Web), go to CanvasWorkspace(Web). <https://canvasworkspace.brother.com>
If you use Tablet, go to CanvasWorkspace (Web) . <https://canvasworkspace.brother.com>
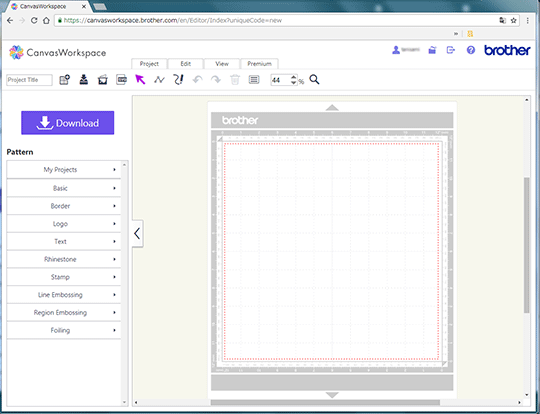
- For details on CanvasWorkspace, refer to About CanvasWorkspace.
- For details on the differences between CanvasWorkspace(Web) and CanvasWorkspace, refer to What are the differences between CanvasWorkspace (Web) and CanvasWorkspace
- The screen that is displayed depends on your OS.
CanvasWorkspace
A pattern can be sent to a cutting machine using the following three methods.
- Internet connection required when sending the data via a wireless network connection.
- The USB flash drive and USB cable are sold separately.
- Enclosed accessories differ depending on model.
Sending via a wireless network connection
A pattern created in CanvasWorkspace can be sent via a wireless network connection to a cutting machine, where it can be cut out.
Before using this method, the following setup operations must be performed.
-
A computer and the cutting machine must be connected via a wireless network connection.
For details on setting up the wireless network connection, refer to How to connect my machine to a wireless network using the Setup Wizard. -
Machine must be registered with Canvas Workspace.
For details on registering with CanvasWorkspace for your machine, refer to How to register Your Machine with CanvasWorkspace.
-
Open CanvasWorkspace on your computer, and then log in.
-
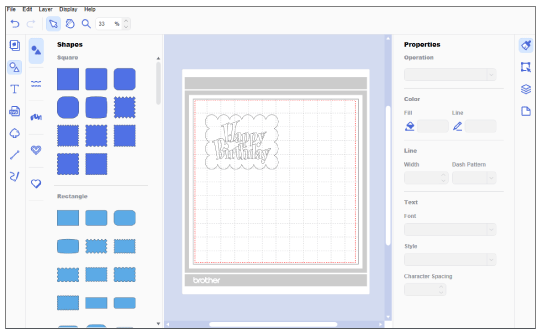
Create the pattern to be cut out (or drawn).
-
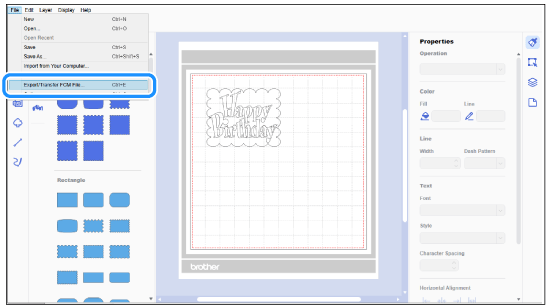
Select [Export / Transfer FCM File] from the [File] menu.
-
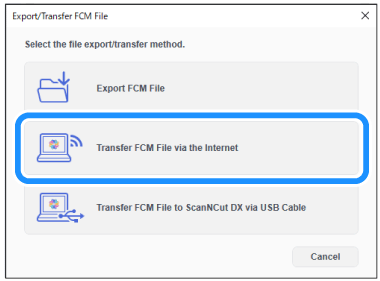
Select the file [Transfer FCM File via the internet] .
-
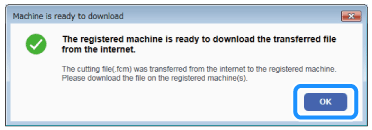
Click [OK] .
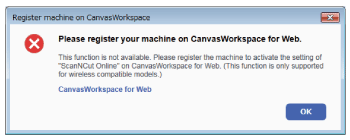
If the following screen appears, register your machine. For details, refer to How to register Your Machine with CanvasWorkspace .
-
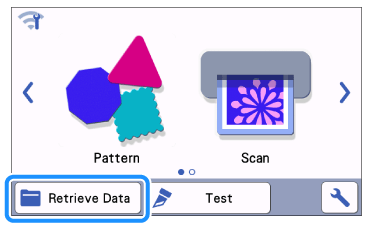
Touch [Retrieve Data] in the screen that appears in the LCD display screen of the cutting machine.
-
Touch
 .
.
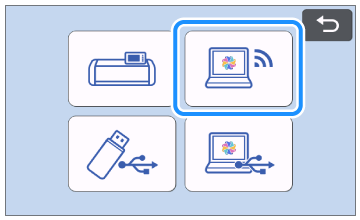
>> The pattern transferred from CanvasWorkspace is displayed.
-
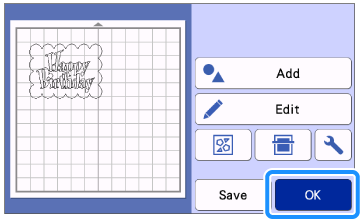
Check the pattern, and then touch [OK] .
-
Attach the material to the mat, and then insert the mat into the cutting machine.
-
Insert the holder into the carriage.
-
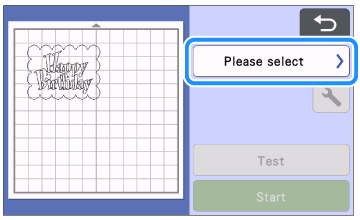
Touch [Please select] from the LCD display screen of the cutting machine.
-
Select the operation, and then press [Start] .

Before cutting the material, be sure to perform test cut (trial cut). For details on trial cutting, refer to How do I perform trial cutting? (Test Cut) .
Sending using a USB flash drive
-
Plug the USB flash drive into the computer.
-
Open CanvasWorkspace on your computer, and then log in.
-
Create the pattern to be cut out (or drawn).

-
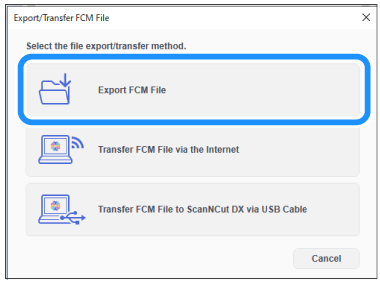
Select [Export / Transfer FCM File] from the [File] menu.

-
Select the file [Export FCM File] .
-
Open the Computer (My Computer) folder on the computer, and then select Removable Disk . Save the pattern data to Removable Disk .
>> The pattern data is converted to cutting data and saved as an FCM file.
-
Unplug the USB flash drive from the computer, then plug it into the cutting machine.
-
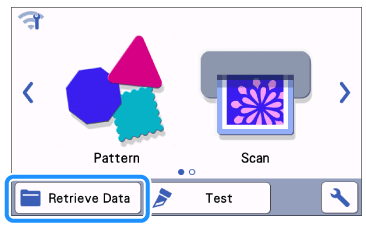
Touch [Retrieve Data] in the screen that appears in the LCD display screen of the cutting machine.
-
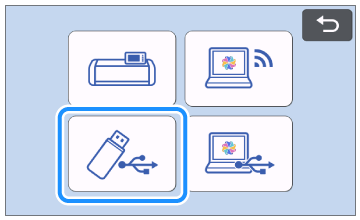
Touch
 .
.
-
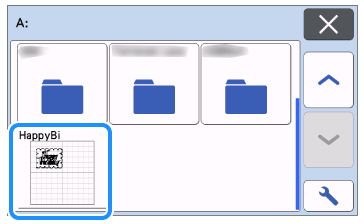
Select the pattern to be cut out (or drawn).
-
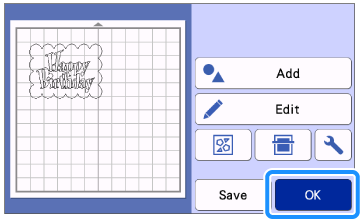
Check the pattern, and then touch [OK] .
-
Attach the material to the mat, and then insert the mat into the cutting machine.
-
Insert the holder into the carriage.
-
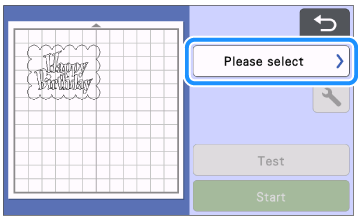
Touch [Please select] from the LCD display screen of the cutting machine.
-
Select the operation, and then press [Start] .

Before cutting the material, be sure to perform test cut (trial cut). For details on trial cutting, refer to How do I perform trial cutting? (Test Cut) .
Sending using a USB cable (Windows only)
-
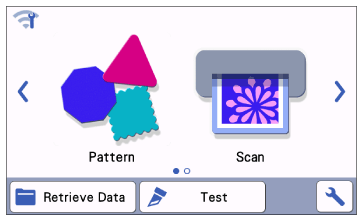
Make sure that the home screen is displayed on the LCD display screen.
-
Connect the computer and cutting machine with a USB cable.
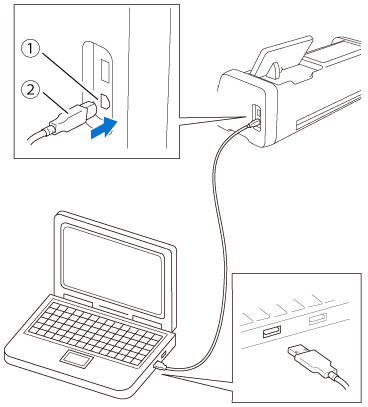
(1) USB port for computer
(2) USB cable connector
-
Open CanvasWorkspace on your computer, and then log in.
-
Create the pattern to be cut out (or drawn).

-
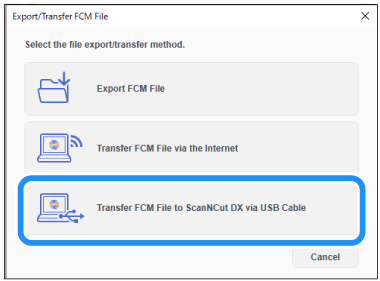
Select [Export / Transfer FCM File] from the [File] menu.

-
Select the file [Transfer FCM File to ScanNCut DX via USB Cable] .
-
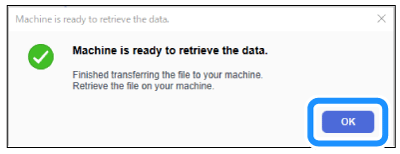
Click [OK] .
-
Touch [Retrieve Data] in the screen that appears in the LCD display screen of the cutting machine.

-
Touch
 .
.
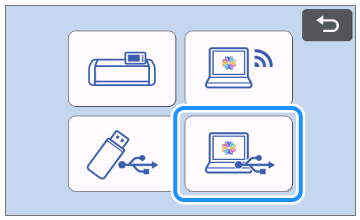
>> The pattern transferred from CanvasWorkspace is displayed.
-
Check the pattern to be cut out (or drawn), and then touch [OK] .

-
Attach the material to the mat, and then insert the mat into the cutting machine.
-
Insert the holder into the carriage.
-
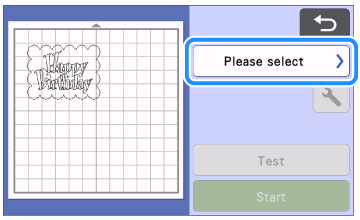
Touch [Please select] from the LCD display screen of the cutting machine.
-
Select the operation, and then press [Start] .

Before cutting the material, be sure to perform test cut (trial cut). For details on trial cutting, refer to How do I perform trial cutting? (Test Cut) .
CanvasWorkspace (Web)
A pattern can be sent to a cutting machine using the following two methods.
- Internet connection required when sending the data via a wireless network connection
-
The USB flash drive is sold separately.
Enclosed accessories differ depending on model. - Use the CanvasWorkspace when sending the created pattern to the cutting machine using a USB cable. Refer to CanvasWorkspace .
Sending via a wireless network connection
A pattern created in CanvasWorkspace (Web) can be sent via a wireless network connection to a cutting machine, where it can be cut out.
Before using this method, the following setup operations must be performed.
-
A computer and the cutting machine must be connected via a wireless network connection.
For details on setting up the wireless network connection, refer to How to connect my machine to a wireless network using the Setup Wizard . -
A machine is registered with CanvasWorkspace must be set up.
For details on registering with CanvasWorkspace for your machine, refer to How to register Your Machine with CanvasWorkspace .
-
Open CanvasWorkspace (Web) <https://canvasworkspace.brother.com> , and then log in.
-
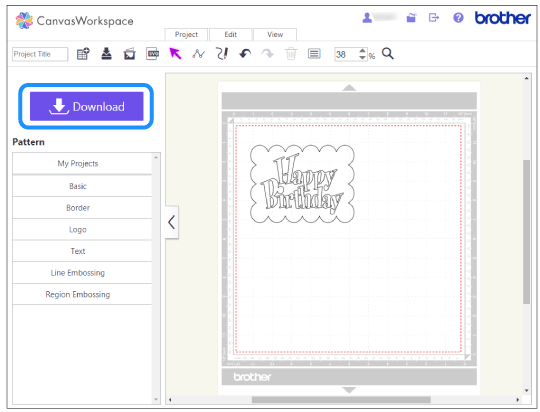
Create the pattern to be cut out (or drawn), and then click [Download] .
-
Click [Transfer] .
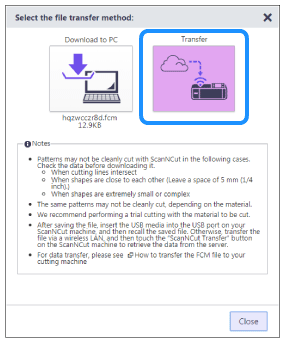

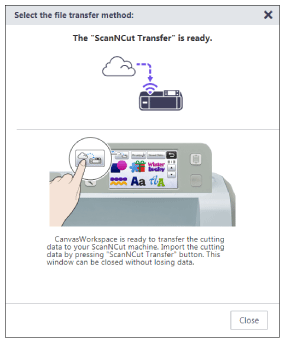
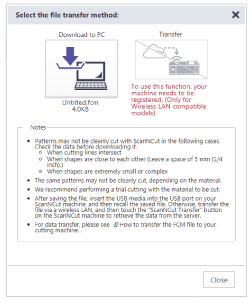
>> The following screen appears. If you cannot select the Transfer icon, register your machine on CanvasWorkspace.
For details, refer to How to Register Your Machine with CanvasWorkspace.
-
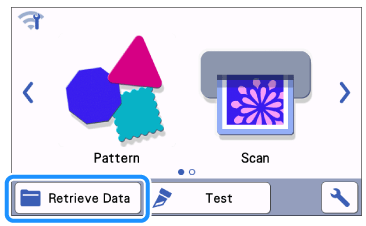
Touch [Retrieve Data] in the screen that appears in the LCD display panel of the cutting machine.
-
Touch
 .
.
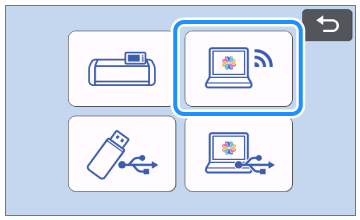
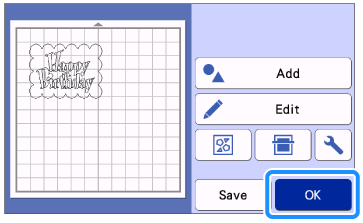
>> The pattern transferred from CanvasWorkspace is displayed.
-
Check the pattern, and then touch [OK] .
-
Attach the material to the mat, and then insert the mat into the cutting machine.
-
Insert the holder into the carriage.
-
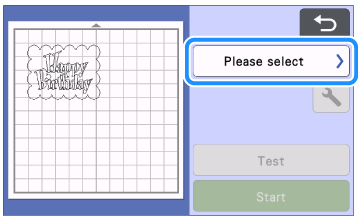
Touch [Please select] from the LCD display panel of the cutting machine.
-
Select the operation, and then press [Start] .

Before cutting the material, be sure to perform test cut (trial cut). For details on trial cutting, refer to How do I perform trial cutting? (Test Cut) .
Sending using a USB flash drive
-
Plug the USB flash drive into the computer.
-
Open CanvasWorkspace (Web) <https://canvasworkspace.brother.com/> , and then log in.
-
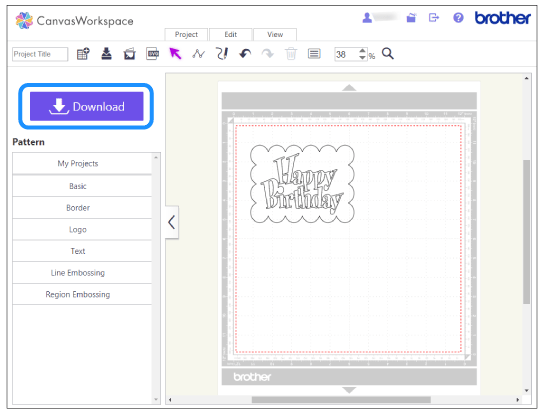
Create the pattern to be cut out (or drawn), and then click [Download] .
-
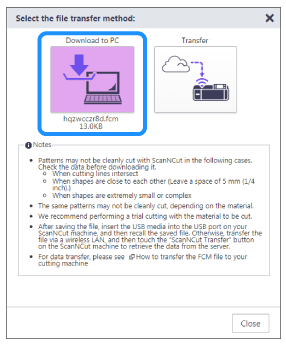
Select [Download to PC] .
-
Open the Computer (My Computer) folder on the computer, and then select Removable Disk . Save the pattern data to Removable Disk.
>> The pattern data is converted to cutting data and saved as an FCM file.
-
Unplug the USB flash drive from the computer, then plug it into the cutting machine.
-
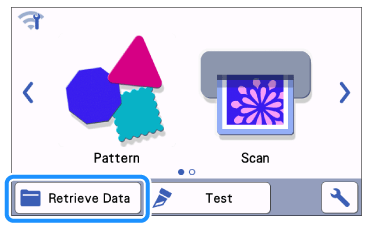
Touch [Retrieve Data] in the screen that appears in the LCD display panel of the cutting machine.
-
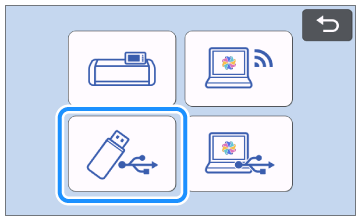
Touch
 .
.
-
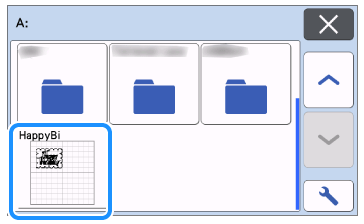
Select the pattern to be cut out (or drawn).
-
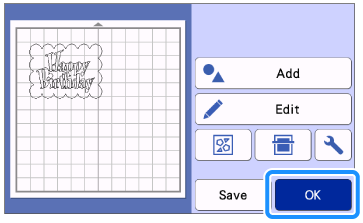
Check the pattern, and then touch [OK] .
-
Attach the material to the mat, and then insert the mat into the cutting machine.
-
Insert the holder into the carriage.
-
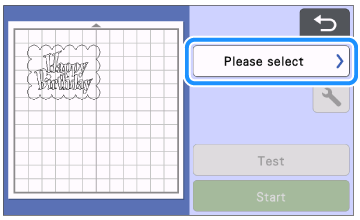
Touch [Please select] from the LCD display panel of the cutting machine.
-
Select the operation, and then press [Start] .

Before cutting the material, be sure to perform test cut (trial cut). For details on trial cutting, refer to How do I perform trial cutting? (Test Cut) .
