DCP-J725DW
FAQs & Troubleshooting |
Scan multiple pages into one file instead of each scan being saved as a separate file.
In order to scan a multi-page document into a single file, you must configure the scan to use a file type that supports multi-page documents. Complete the steps listed below:
When you scan a document, you can either use the ADF (automatic document feeder) or the Flatbed scanner glass.
To see how to scan multiple pages into one file using the ADF, click here.
To see how to scan multiple pages into one file using the Flatbed scanner glass, click here.
Scanning from an Automatic Document Feeder (ADF)
> Click here to see how to scan from Home Mode of ControlCenter4 for Windows.
> Click here to see how to scan from Advanced Mode of ControlCenter4 for Windows.
> Click here to see how to scan from ControlCenter2 for Macintosh.
How to scan from Home Mode of ControlCenter4 for Windows
-
Load your document, face down, top edge first in the ADF.
-
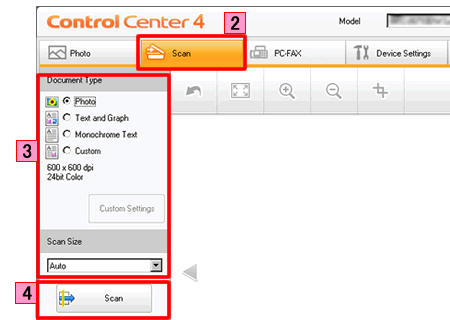
Click the SCAN tab.
-
Select the Document Type and Scan Size.
-
Click Scan.
-
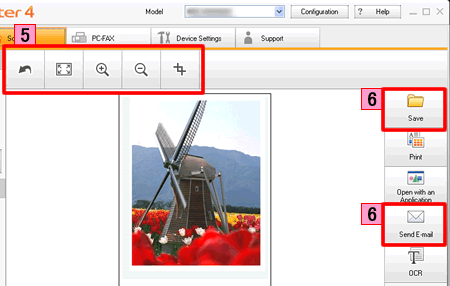
The scanned image will be display the image viewer. Confirm and edit (if necessary) the scanned image.
-
Click Save or Send E-mail.
-
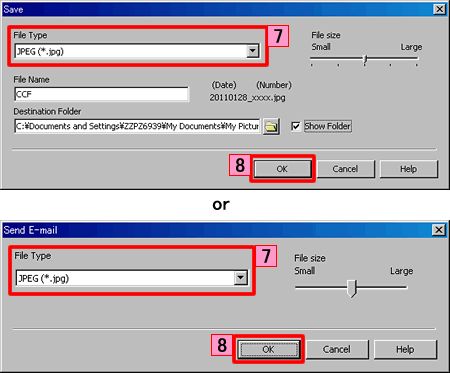
The dialog will appear. Under File Type select an option that allows multi-page documents:
- TIFF Multi-Page (*.tif)
- PDF (*pdf)
- Secure PDF (*.pdf)
- XML Paper Specification (*.xps)
-
Click OK.
How to scan from Advanced Mode of ControlCenter4 for Windows
-
Load your document, face down, top edge first in the ADF.
-
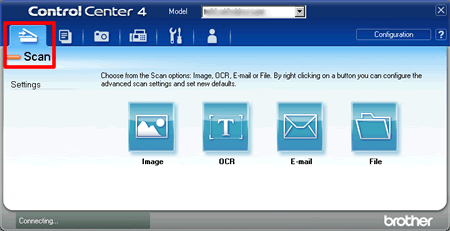
Click Scan tab.
-
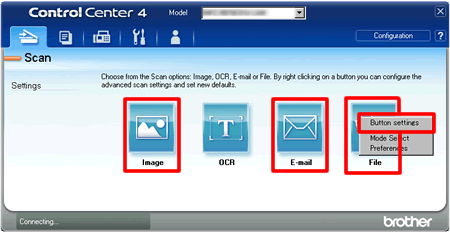
Right-click the Image button, File button or E-mail button, then select Button settings.
-
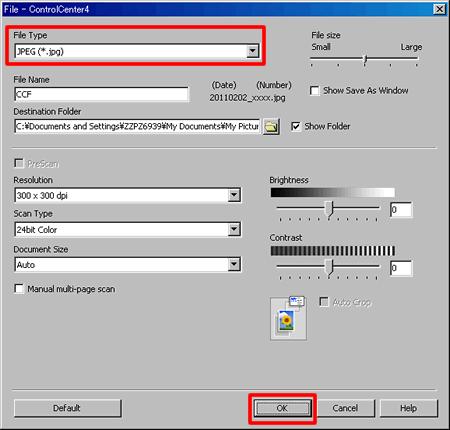
The Scan to configuration window will appear. The screens may differ depending on your choice.
-
Under File Type select an option that allows multi-page documents:
- TIFF Multi-Page (*.tif)
- PDF (*pdf)
- Secure PDF (*.pdf)
- XML Paper Specification (*.xps)
-
Click OK.
-
Click the type of scan you require. The buttons are: Image, E-mail and File.
If the scan settings dialog box appear, click Scan.
How to scan from ControlCenter2 for Macintosh
-
Load your document, face down, top edge first in the ADF.
-
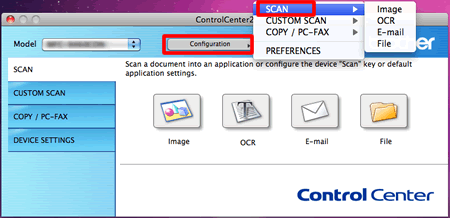
Click on Configuration -> SCAN.
-
Select the type of scan you require. The choices are: Image, E-mail and File.
-
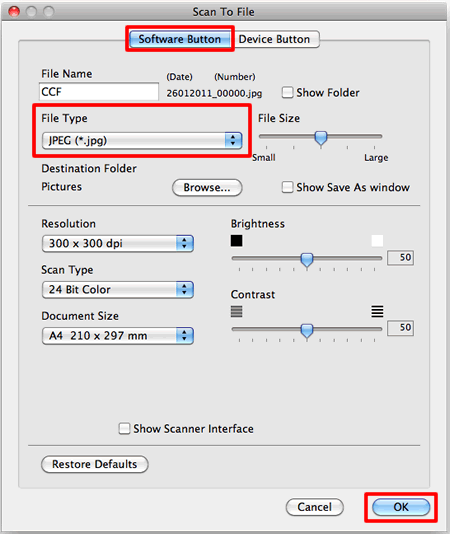
The Scan to configuration window will appear. The screens may differ depending on your choice.
-
Select the Software Button tab.
-
Under File Type select an option that allows multi-page documents:
- TIFF multi-Page (*.tif)
- PDF (*pdf)
- Secure PDF (*.pdf)
- High Compression PDF (*.pdf)
-
Click OK.
-
Click the type of scan you require. The buttons are: Image, E-mail and File.
If the scan settings dialog box appear, click Start Scanning.
Scanning from the Flatbed scanner glass
> Click here to see how to scan from Home Mode of ControlCenter4 for Windows.
> Click here to see how to scan from Advanced Mode of ControlCenter4 for Windows.
> Click here to see how to scan from ControlCenter2 for Macintosh.
How to scan from Home Mode of ControlCenter4 for Windows
-
Lift the document cover.
-
Place the documents face down on the scanner glass.
-
Close the document cover.
-
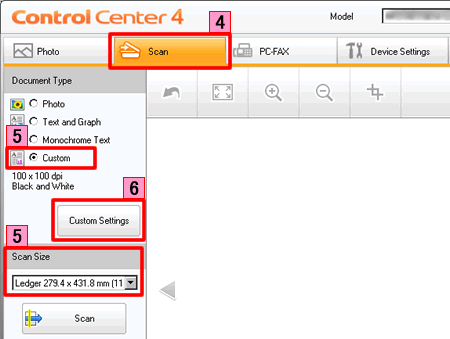
Click Scan tab.
-
Select Custom and Scan size.
-
Click Custom Settings.
-
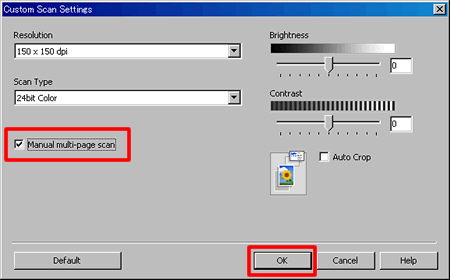
The Custom Scan Settings window will appear. Configure scan settings and check Manual multi-page scan or Continuous Scanning, and then click OK.
-
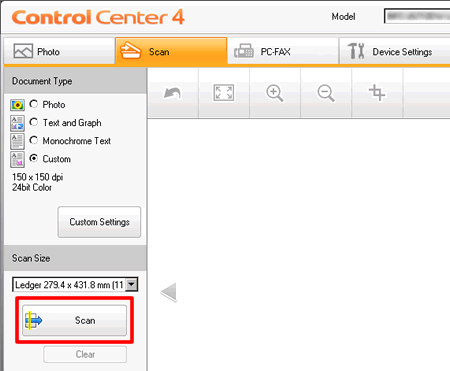
Click Scan. The machine will then start scanning.
-
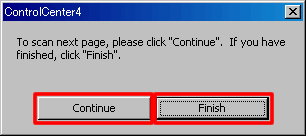
When scanning is finished, it will ask if you wish to scan more pages. If you want to scan more pages, put the next document on the scanner glass and press the Continue button. When you have finished scanning all your documents, click the Finish button.
-
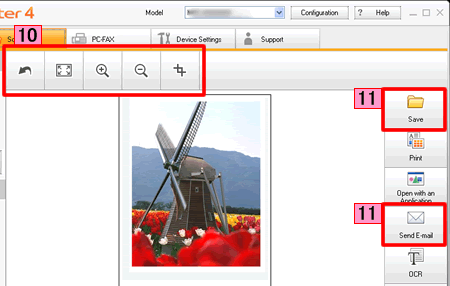
The scanned image will be display the image viewer. Confirm and edit (if necessary) the scanned image.
-
Click Save or Send E-mail.
-
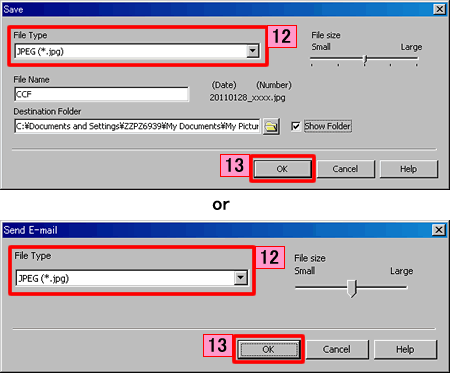
The dialog will appear. Under File Type select an option that allows multi-page documents:
- TIFF multi-Page (*.tif)
- PDF (*pdf)
- Secure PDF (*.pdf)
- XML Paper Specification (*.xps)
-
Click OK.
How to scan from Advanced Mode of ControlCenter4 for Windows
-
Lift the document cover.
-
Place the documents face down on the scanner glass.
-
Close the document cover.
-
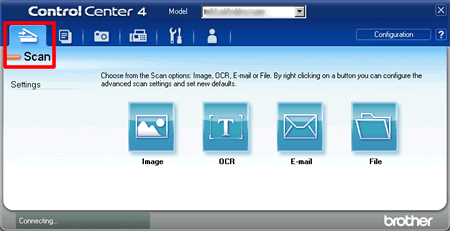
Click Scan tab.
-
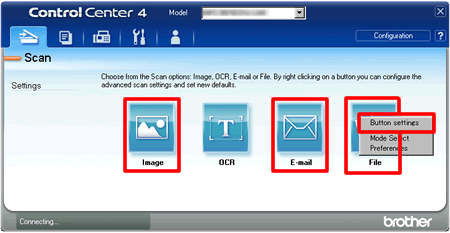
Right-click the Image button, File button or E-mail button, then select Button settings.
-
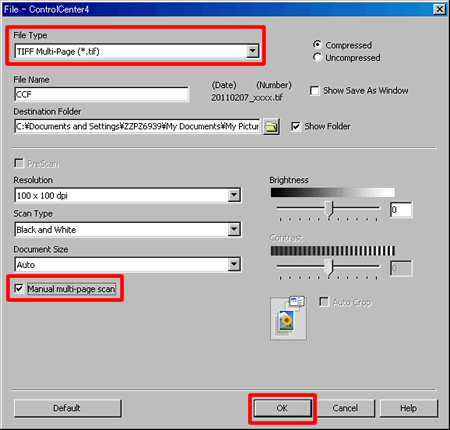
The Scan to configuration window will appear. The screens may differ depending on your choice.
-
Under File Type select an option that allows multi-page documents:
- TIFF multi-Page (*.tif)
- PDF (*pdf)
- Secure PDF (*.pdf)
- XML Paper Specification (*.xps)
-
Configure scan settings and check Manual multi-page scan or Continuous Scanning.
-
Click OK.
-
Click the type of scan you require. The buttons are: Image, E-mail and File. The machine will then start scanning.
If the scan settings dialog box appear, click Scan.
-
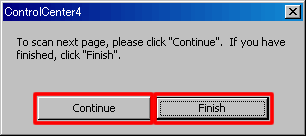
When scanning is finished, it will ask if you wish to scan more pages. If you want to scan more pages, put the next document on the scanner glass and press the Continue button. When you have finished scanning all your documents, click the Finish button.
How to scan from ControlCenter2 for Macintosh
-
Lift the document cover.
-
Place the documents face down on the scanner glass.
-
Close the document cover.
-
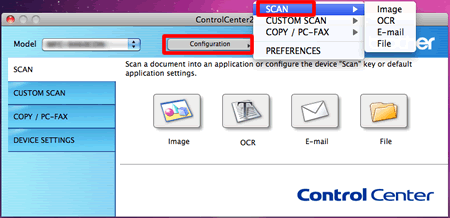
Click on Configuration -> SCAN
-
Select the type of scan you require. The choices are: Image, E-mail and File.
-
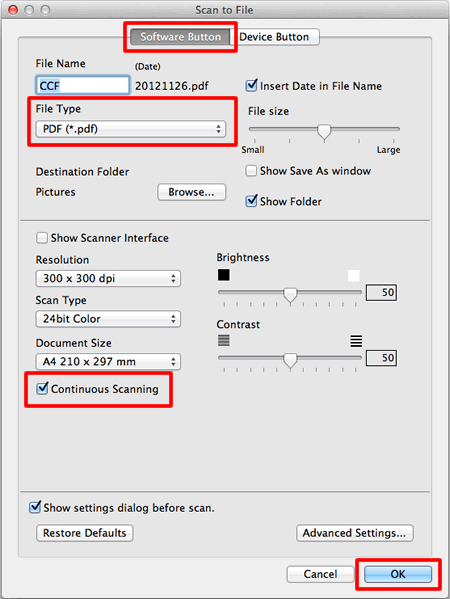
The Scan to configuration window will appear. The screens may differ depending on your choice.
-
Select the Software Button tab.
-
Under File Type select an option that allows multi-page documents:
- TIFF Multi-Page (*.tif)
- PDF (*.pdf)
- Secure PDF (*.pdf)
- High Compression PDF (*.pdf)
-
Configure scan settings and check Manual Multi-Page scan or Continuous Scanning.
-
Click OK.
-
Click the type of scan you require. The buttons are: Image, E-mail and File.
If the scan settings dialog box appear, click Start Scanning.
