Downloads
Update software |
How to Install
To check the software version | To update the software | Update History
How to check the software version of your machine
-
Press the power switch to turn on your machine, then touch the screen.
-
Press
 (Machine Setting Mode Key) at the bottom of the display.
The settings screen appears.
-
Switch screens by using
 (Previous page key) or
  (Next page key) to display the software version.
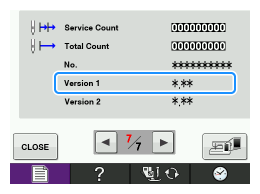
- If "Version 1" shown, is already "5.20" or later, it is not necessary to update your machine with the program on this page.
How to update your machine's software
Do not turn off your machine while the machine is saving the update software to itself.
If the machine's power is turned off while saving the update software, it may result in damage to the machine.
You can use USB Flash drive (USB Flash memory) or your computer to download software updates for your machine.
Update procedure using USB Flash drive (USB Flash memory)
Update procedure using computer
Update procedure using USB Flash drive (USB Flash memory)
When using USB Flash drive (USB Flash memory) to update the software, check that no data other than the update file is saved on the USB Flash drive (USB Flash memory) being used before starting to update.
-
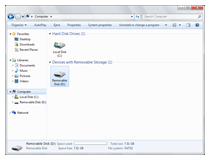
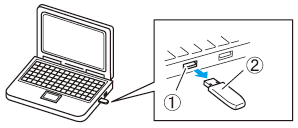
Insert the USB Flash drive (USB Flash memory) into the USB port on the computer.

(1) USB port on the computer (2) USB Flash drive (USB Flash memory)
-
The "Removable Disk" icon appears in "Computer (My computer)" on the computer.
-
Copy the update file to "Removable Disk".
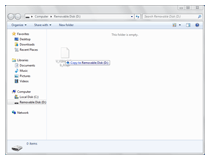
----- Note -----
The USB Flash drive (USB Flash memory) should only contain the update file. -
Safely remove the USB Flash drive (USB Flash memory) from the USB port on the computer.
(1) USB port on the computer (2) USB Flash drive (USB Flash memory)
-
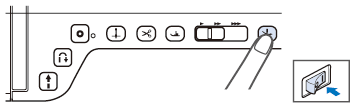
While pressing "Automatic Threading Button
 ", turn the main power to ON.
-
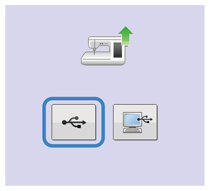
The following screen will appear on the LCD. Press
 (USB media key).
-
Insert the USB Flash drive (USB Flash memory) into the USB port for media/ mouse on the machine.
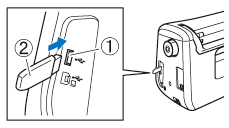
(1) USB port for media/ mouse (2) USB Flash drive (USB Flash memory)
-
When using USB Flash drive (USB Flash memory) equipped with an access indicator, the access indicator will begin flashing after the media is inserted into your computer or machine, and may take about 5 to 6 seconds before the USB Flash drive (USB Flash memory) is recognized.
(The length of time differs depending on the USB Flash drive (USB Flash memory).)
-
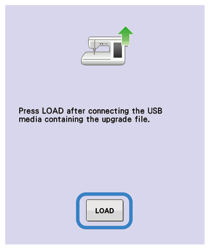
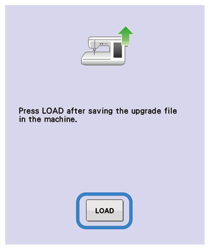
Press
 (LOAD key).
-
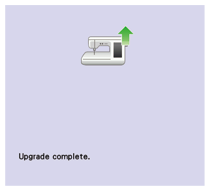
When the following screen appears, updating is completed.
-
Remove the USB Flash drive (USB Flash memory), and turn the machine off and on again.
- The machine's software has been updated.
Update procedure using computer
-
While pressing "Automatic Threading Button ", turn the main power to ON.
-
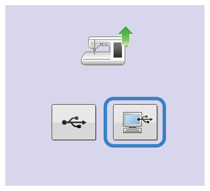
The following screen will appear on the LCD. Press
 (Computer (USB) key).
-
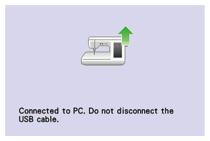
Plug the USB cable connector into the corresponding USB ports for the computer and for the machine.
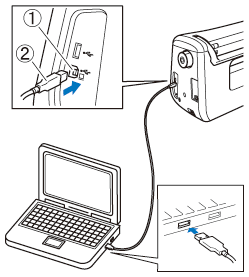
(1) USB port for computer (2) USB cable connector
-
"Removable Disk" will appear in "Computer (My computer)".
Copy the update file to "Removable Disk".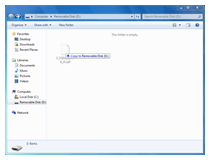
-
The following message will appear.
-
When the message disappears, press (LOAD key).
-
When the following screen appears, updating is completed.
-
Unplug the USB cable, and turn the machine off and on again.
- The machine's software has been updated.
Update History
Version 5.20 (December 2023)
- Improved functionality during sewing.
Version 5.14 (April 2023)
- Improved machine's functionality of opening and closing the shutter of take-up lever.
- Improved the screen display when "French" is selected as the language. (North America region only)
- Improved machine's functionality for the automatic threading function.
Version 5.13 (October 2022)
-
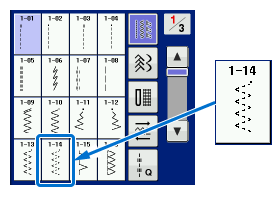
Improved the thumbnail of the stitch selection key and the sewing pattern for the following stitch pattern.
No.1-14 : 3 steps elastic zigzag
-
Added the following stitch to the Utility Stitch category.
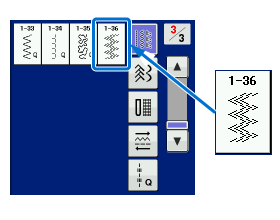
No.1-36 : 2 steps elastic zigzag
-
Improved functionality of sewing with the dual feed foot when using the following stitch pattern.
No.3-18 : Hemstitching
No.3-19 : Hemstitching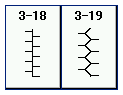
- Improved the automatic presser foot lifting function that lowers the presser foot at the start of sewing.
Version 5.12 (January 2022)
- Periodic software update, does not affect consumer features.
Version 5.10 (August 2021)
- Reduced operating noise when using the Dual feed foot.
Version 4.01 (October 2019)
- Improved functionality of mouse operation
Version 4.00 (June 2019)
-
The stitch width settings of the following buttonhole will be changed to up to 6 mm.
The stitch number 4-01 through 4-08
- Improved machine's functionality for reading the pattern data from USB DVD/CD drive
Version 3.03 (February 2018)
- Improved machine's functionality for returning the presser foot to the proper position after canceling the free motion sewing mode.
Version 3.02 (November 2017)
-
Improved machine's functionality for Automatic Presser Foot Lift functions.
This function cannot be used when using the function to specify the sewing end point with the sensor pen.
The function can only be used with stitches where presser foot "J", "N" or "X" is indicated in the upper-left corner of the screen. If any other stitch is selected, it is not available.Note :
Automatic Presser Foot Lift functions are only available for Premium Pack II (Upgrade Kit II) users. - Modified the illustrations for explaining the usage of a certain stitch in the sewing guide function.
Version 3.01 (September 2017)
- Functionality update for only Upgrade Kit 2 users.
Version 2.01 ( September 2015)
-
Added the Reinforcement Priority function.
"Reinforcement Priority" has been added to page 3 of the settings screen.
To learn new features, read the instructions for "Reinforcement Priority".
Click here to get the instructions for new features.
* This feature is available for the sewing functions only.
-
Improved the following sewing function.
- The sewing speed for decorative stitches (from 400 spm to 710 spm)
-
The speed to begin sewing utility stitches and decorative stitches (from 70 spm to 110 spm)
* "spm" is the number of stitches sewn in one minute.
-
Enhanced the texture of hand-look quilting stitch.

-
Improved machine's functionality for the following features or some issues.
- Selecting or editing stitch patterns in the Utility Stitch Screen
Version 1.12 (November 2013)
- Fixed the situation where the machine may not sew reinforcement stitches correctly when using the pivot function or the free motion sewing mode.
Content Feedback
Step 1: How does the software on this page help you?
Step 2: If you have selected "Not helpful", choose from the following list that is close to your "Not helpful" reason. (multiple answers allowed)
Step 3: Are there any comments you would like to add?
Please note this form is used for feedback only.