Downloads
Update software |
How to Install
To check the software version | To update the software | Update History
How to check the software version of your machine
-
Press the power switch to turn on your machine, then touch the screen.
-
Press
 (Settings Key) at the bottom of the display.
The settings screen appears.
-
Switch screens by using
 (Previous page key) or
  (Next page key) to display the software version.
- If machine version is already “4.25” or later, it is not necessary to update your machine with the software found on this page.
How to update your machine's software
You can use USB Flash drive (USB Flash memory) or a computer to download software updates for your machine.
>>> Update procedure using USB Flash drive (USB Flash memory)
>>> Update procedure using computer
Update procedure using USB Flash drive (USB Flash memory)
When using USB Flash drive (USB Flash memory) to update the software, check that no data other than the update file is saved on the USB Flash drive (USB Flash memory) being used before starting to update.
-
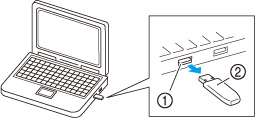
Insert the USB Flash drive (USB Flash memory) into the USB port on the computer.
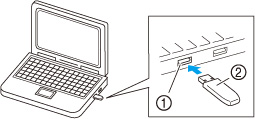
 USB port on the computer
  USB Flash drive (USB Flash memory)
 -
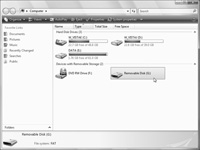
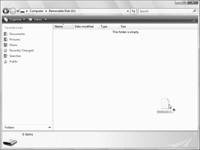
The “Removable Disk” icon appears in “Computer (My computer)” on the computer.
-
Copy the update file to “Removable Disk”.
----- Note -----
The USB Flash drive (USB Flash memory) should only contain the update file. -
Safely remove the USB Flash drive (USB Flash memory) from the USB port on the computer.
USB port on the computer USB Flash drive (USB Flash memory) -
While pressing the automatic threading button, turn the main power to on.
-
The following screen will appear on the LCD.
Touch (USB media key).
![Touch [USB media key].](/g/s/hf/img/pr650/common/ug002um.jpg)
-
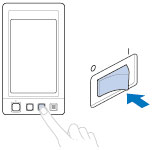
Insert the USB Flash drive (USB Flash memory) into the primary (top) USB port on the machine.
Primary (top) USB port for media
USB Flash drive (USB Flash memory) -
When using USB Flash drive (USB Flash memory) equipped with an access indicator, the access indicator will begin flashing after the media is inserted into your computer or machine, and may take about 5 to 6 seconds before the USB Flash drive (USB Flash memory) is recognized.
(The length of time differs depending on the USB Flash drive (USB Flash memory).)
-
Touch
 (LOAD key).
![Touch [LOAD key].](/g/s/hf/img/pr650/en/ug005um_en.jpg)
-
When the following screen appears, updating is completed.

-
Remove the USB Flash drive (USB Flash memory), and turn the machine off and on again.
- The machine's software has been updated.
Update procedure using computer
-
While pressing the automatic threading button, turn the main power to on.
-
The following screen will appear on the LCD.
Touch (Computer (USB) key).
![Touch [Computer (USB) key].](/g/s/hf/img/pr650/common/ug002pc.jpg)
-
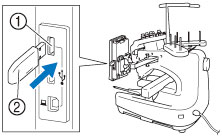
Plug the USB cable connector into the corresponding USB ports for the computer and for the machine.
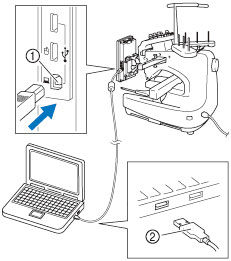
USB port for computer
USB cable connector -
“Removable Disk” will appear in “Computer (My computer)”.
Copy the update file to “Removable Disk”.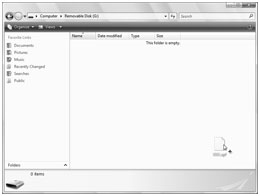
-
Touch (LOAD key).
![Touch [LOAD key].](/g/s/hf/img/pr650/en/ug005pc_en.jpg)
-
When the following screen appears, updating is completed.
-
Unplug the USB cable, and turn the machine off and on again.
- The machine's software has been updated.
Update History
Version 4.25 (May 2016)
- Version number change only / No change in Functionality
Version 4.24 (January 2016)
-
Improved functionality of the following feature
- Running Stitch uniformity with frame pattern enlargement.
-
Added
 (ALL CLEAR) key to delete all the specified colors from the custom thread palette.
Version 4.22 (January 2015)
- Fixed minor issues.
Version 4.21 (December 2013)
- Fixed the situation where the machine may not work correctly after the error message was displayed by selecting the appliqué setting.
-
Improved so that the embroidery pattern moves by 0.1 mm when the arrow keys are pressed on the pattern editing screen.
When you keep pressing the arrow keys, the pattern moves by 5 mm.
Version 4.20 (September 2013)
- Fixed the situation where the embroidery pattern was not rotated 180 degrees if the embroidery frame was changed from a cap frame to a different type of frame or from a different type of frame to a cap frame when the machine finished sewing the pattern using the Link function.
Version 4.10
- Corrected the misspellings of some messages. (Russian, German)
Version 4.01 (January 2013)
-
Fixed the situation where the machine may not cut short jumpstitches when "thread trimming" setting is "ON" in the settings screen.
--- Note ---
To cut short jumpstitches, use embroidery data created with PE-DESIGN NEXT.
(pes file version is 9.0 or later.)
Version 4.00 (September 2012)
- The pause marks are displayed where the machine will stop for the appliqué patterns at the thread color sequence display.
- Improved so that the appliqué patterns with "APPLIQUE MATERIAL", "APPLIQUE POSITION" or "APPLIQUE" are assigned to the same needle bar.
- Changed so that The range of "Appliqué Distance" is between 0.0 mm and 10.0 mm (between 0" and 0.4" ) in the settings screen.
- Revised the wording of messages (Portuguese)
Version 3.10 (February 2012)
-
Improved the performance for displaying the image on the LCD.
Improves response time when touching keys on screen. - Reduced the time for tracing corners of pattern when checking the embroidery area.
-
Added the three keys for switching the frame movement speed to move the embroidery position.
-
The embroidery time indicator on the LCD updates every minute.
-
The Thread color cancelling key is changed from
 to
to  .
.
-
Added the "Reset" key to cancel the temporary needle bar setting position.
- Revised the wording of messages. (Portuguese)
Version 3.02 (August 2011)
- Revised a wording of an error message. (French)
Content Feedback
Step 1: How does the software on this page help you?
Step 2: If you have selected "Not helpful", choose from the following list that is close to your "Not helpful" reason. (multiple answers allowed)
Step 3: Are there any comments you would like to add?
Please note this form is used for feedback only.