Downloads
PE-DESIGN 10 Update software |
How to Install
To update the software | Update History
How to update your PE-DESIGN 10 to Version 10.3
-
Double-click the downloaded file (ped1030eng/fre/ger/dut/spa/ita/por/rus/chi.exe) on the File Explorer.
The update installation wizard will start. -
Follow the installation screen directions to update the software.
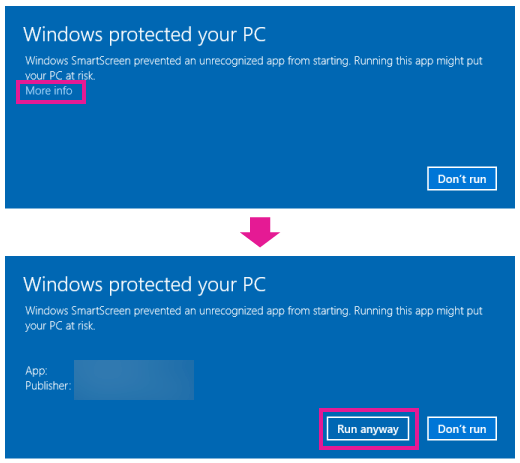
If the following message screen appears when running the downloaded file, click "More info" and then click "Run anyway" to run the update installer.

Update History
October 2017 Version 10.3
Only the affected applications of PE-DESIGN 10 will show the version of this update.
Current version of each application is as follows:
| Layout & Editing | 10.3 |
| Design Center | 10.3 |
| Programmable Stitch Creator | 10.21 |
| Design Database | 10.3 |
| Font Creator | 10.3 |
| Link | 10.3 |
[ General ]
-
The notation of design page size for inches as the display unit has been revised to match with the notation of frame size on the display of single-needle embroidery machine.
For detailed information, refer to the following table.
Table of the revised notation of design page size for inches (PE-DESING 10 version 10.3) [PDF, 139 KB]
[ Layout & Editing ]
-
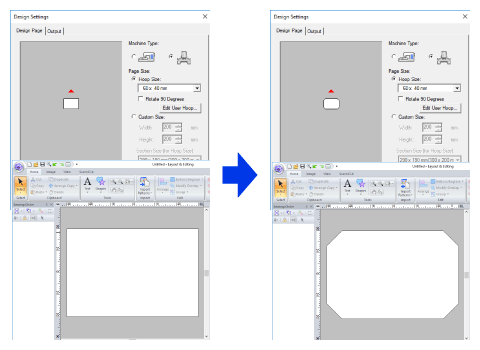
The design page settings of embroidery frame (small) [Hoop size : 60 x 40 mm / 2-3/8" x 1-1/2"] for multi-needle embroidery machine has been modified.

October 2016 Version 10.21
[ Layout & Editing ]
-
Changed the function for transferring embroidery patterns to embroidery machines.
([Send] - [Send to Your Machine] function)
The embroidery design will be transferred to the embroidery machine as "Untitled.pes" in the fixed file name. - Improved the application function for saving a pattern data as FCM file formatting or sending a pattern data to ScanNCutCanvas.
August 2016 Version 10.2
[ General ]
-
Revised the thread color names for matching their words between the embroidery machines and PE-DESIGN 10.
(* The changes depend on languages.)For detailed information, refer to the following table.
Table of the revised thread color names (PE-DESIGN 10 version 10.2) [PDF, 187 KB]
[ Layout & Editing ]
-
Added features of compatibllity with ScanNCut (Brother cutting machine) and ScanNCutCanvas (online service for Brother cutting machines).
-
Added the [ScanNCut] tab.
ScanNCut can be compatible with PE-DESIGN by this tab. -
Exporting or imported an FCM File
A created embroidery pattern can be exported as data in the .fcm format so that it can be cut out using ScanNCut.
An FCM file can be imported into PE-DESIGN as an embroidery pattern. -
Sending a cutting data to ScanNCutCanvas
From this software, patterns can be sent to ScanNCutCanvas.
In addition, patterns can be sent from ScanNCutCanvas to your ScanNCut machine (wireless network models only).
Added Features of Version 10.2
You can read the additional manual on the software.
Click (Help) button in the upper-right corner of Layout & Editing, and then click [About new features in Ver. 10.2…] in the menu.
 -
Added the [ScanNCut] tab.
-
The following new embroidery frame settings are available in the Design Settings dialog box.
(* Availability depends on the embroidery machine model.)- 240 x 240 mm (Quilt Frame L) / 9-1/2" x 9-1/2" (Quilt Frame L)
- 70 x 200 mm (Sleeve Frame) / 2-3/4" x 7-7/8" (Sleeve Frame)
-
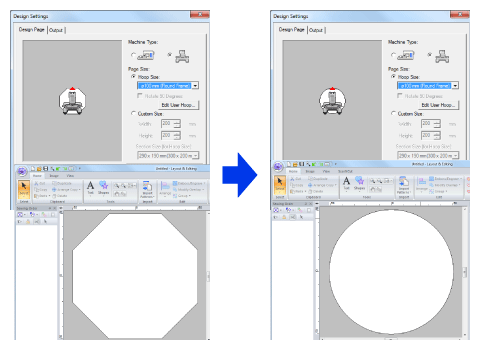
Modified the embroidery frame settings for Round Frames.

- Improved the application function for importing an embroidery data (.pes) created on the previous version software into the design page.
- Improved the Import function when using a vector image data with Scalable Vector Graphics (.svg) file formatting
- Improved the application function when importing a vector image data with Windows Metafile (.wmf) file formatting.
- Improved the quality of font data for some characters in the built-in font No.031.
[ Design Center ]
-
The following new embroidery frame settings are available in the Design Page Settings dialog box.
(* Availability depends on the embroidery machine model.)- 240 x 240 mm (Quilt Frame L) / 9-1/2" x 9-1/2" (Quilt Frame L)
April 2016 Version 10.11
[ Layout & Editing ]
- Improved the Photo Stitch 1 Wizard function so that unnecessary running stitches are not created in the embroidery pattern when creating the pattern from a photo using the monochrome mode as the color option.
- Improved the Applique Wizard function when creating the applique data from the specific pattern.
- Improved the application function when pasting the data on the Design page after copying the data with the stitch pattern into the clipboard.
[ Design Center ]
- Improved the application function for importing the embroidery pattern into Layout & Editing from Design Center.
[ Design Database ]
- Improved the application function when double-clicking the thumbnail of embroidery design in the contents pane to open the embroidery design with Layout & Editing.
[ General ]
- Improved so that PE-DESIGN 10 is started up on the computer that certain specific software is installed and runs in the background.
October 2015 Version 10.1
[ Layout & Editing ]
-
The following new embroidery frame settings are available in the Design Settings dialog box.
(* Availability depends on the embroidery machine model.)- 44 x 38 mm (Compact Frame) / 1-3/4" x 1-1/2" (Compact Frame)
- 50 x 50 mm (Compact Frame) / 2" x 2" (Compact Frame)
- 70 x 41 mm (Compact Frame) / 2-3/4" x 1-5/8" (Compact Frame)
- 33 x 75 mm (Compact Frame) / 1-5/16" x 2-15/16" (Compact Frame)
- 180 x 100 mm (Border Frame) / 7-1/8" x 4" (Border Frame)
- Improved the import application function when using vector image data with Windows Metafile (.wmf) formatting.
July 2015 Version 10.03
[ Layout & Editing ]
- Improved the import application function when using vector image data with Windows Metafile (.wmf) formatting.
- Improved the stamp setting application function when using embroidery data with stamp settings saved by a previous software version.
[ Design Database ]
- Improved sewing information and corresponding column titles in detail view mode contents pane.
May 2015 Version 10.02
[ Layout & Editing ]
- Fixed the situation where the pattern's color may be changed when converting the stitch patterns to blocks using the [Convert to Blocks] command.
- Improved the usability so that the [OK] button is enabled when the [Design Settings] dialog box is opened with the [Set Hoop Size and Fabric] button on the [Startup Wizard].
- Fixed the situation where the thumbnails of particular PES files may not appear in the [Import] pane.
- Fixed the situation where the message "Out of memory" may appear when the mouse pointer is put over the pop-up menu appeared by clicking the right mouse button on the selected pattern.
- Fixed the situation where the sewing order of the patterns may not be optimized when using the [Optimize Sewing Order] command.
- Improved the width of the [Sewing Order] pane so that the [Thread Color] button on the pane is displayed correctly when changing the DPI (text) settings of Windows system to 125%.
-
Improved the usability of editing the embroidery patterns as follows.
- The embroidery patterns which are created using the [Manual Punch] tools will be grouped.
- The [Sewing Attributes] pane will be available to change sewing attribute settings when selecting the grouped embroidery patterns which are created using the [Manual Punch] tools.
- The [Color] pane will be available to change thread colors when selecting the grouped embroidery patterns which are created using the [Manual Punch] tools.
- The tool for editing the pattern's points will be available without pressing the <Alt> key when selecting the grouped patterns using the [Select Point] tool.
-
The tool for editing the pattern's points will be available by double-clicking the frame of the pattern in the [Sewing Order] pane when the [Select Point] tool of the [Select Tools] group in the [Home] tab is active.
(The tool for editing the entry/exit points will be available by the same operation on the [Select Entry/Exit Points] tool.) -
The tool for editing the pattern's points will be available by selecting the [Select Point] tools of the [Select Tools] group in the [Home] tab when the frame of the pattern in the [Sewing Order] pane is selected.
(The tool for editing the entry/exit points will be available by the same operation on the [Select Entry/Exit Points] tool.) - The view of a pattern's order in the [Sewing Order] pane will be kept even if the patterns were edited to move, resize, rotate or reshape.
- Corrected the misspellings of the word. (German)
[ Design Center ]
- Fixed the situation where unexpected underlay stitches may be created outside the embroidery stitches when applying the sewing attribute as the [Zigzag Stitch] to the outline.
September 2014 Version 10.01
[ Layout & Editing ]
- Fixed the situation where a particular pattern may not be selected by the Select Tools.
- Fixed the situation where the Paste Attributes command may not work correctly when pasting the attribute from the copied pattern to the selected pattern in the other window of Layout & Editing.
- Fixed the situation where a sewing direction line may not be added to the inside pattern of the object which hole sewing is applied to.
- Fixed the situation where the patterns may not be merged correctly.
- Fixed the situation where the editing operations may not be performed correctly after selecting the patterns when the grouped patterns are locked.
- Improved the program so that the display setting is applied to all parts of the grouped patterns when changing the display setting for a pattern included in the grouped pattern.
- Fixed the situation where the Undo command may not work correctly after applying the Hole Sewing to the patterns.
[ Design Database ]
- Fixed the situation where the color list in the property dialog box may not be displayed correctly in Windows 8.
Content Feedback
Step 1: How does the software on this page help you?
Step 2: If you have selected "Not helpful", choose from the following list that is close to your "Not helpful" reason. (multiple answers allowed)
Step 3: Are there any comments you would like to add?
Please note this form is used for feedback only.
