LCD messages | Approximate life | How to replace | Model name | |
Toner Low Prepare New X Toner Cartridge. | Toner cartridge X = Cyan, Magenta, Yellow, Black | <Black> <Cyan, Magenta, Yellow> | TN-230BK, TN-230C, TN-230M, TN-230Y | |
Drums End Soon | 4 Drum units | DR-230CL5 | ||
Drum End Soon(X) | 1 Drum unit X = C, M, Y, K C = Cyan M = Magenta Y = Yellow K = Black | |||
Belt End Soon | Belt unit | 50,000 pages1 | BU-200CL | |
WT Box End Soon | Waste toner box | 50,000 pages1 | WT-200CL |
LCD messages | Approximate life | How to replace | Model name | |
Replace Toner | Toner cartridge | <Black> <Cyan, Magenta, Yellow> | TN-230BK, TN-230C, TN-230M, TN-230Y | |
Replace Drums | 4 Drum units | DR-230CL5 | ||
Replace Drum(X) | 1 Drum unit X = C, M, Y, K C = Cyan M = Magenta Y = Yellow K = Black | |||
Drum Error8 | Drum unit | |||
Replace Belt | Belt unit | 50,000 pages1 | BU-200CL | |
Replace WT Box | Waste toner box | 50,000 pages1 | WT-200CL | |
Replace Fuser | Fuser unit | 50,000 pages1 | Call your dealer or Brother Customer Service for a replacement fuser unit. | |
Replace PF Kit | Paper feeding kit | 50,000 pages1 | Call your dealer or Brother Customer Service for a replacement paper feeding kit. | |
| 1 | A4 or Letter size single-sided pages. |
| 2 | Approx. cartridge yield is declared in accordance with ISO/IEC 19798. |
| 3 | 1 page per job. |
| 4 | Drum life is approximate and may vary by type of use. |
| 5 | Contains 4pc. Drum Set. |
| 6 | Contains 1pc. Black Drum Unit. |
| 7 | Contains 1pc. Colour Drum Unit. |
| 8 | The Drum Error message has two cases: If the scroll message shows Replace the Drum Unit. you will need to replace the drum unit. If the scroll message shows Slide the Green tab on Drum Unit. you do not need to replace the drum unit, you just need to clean the corona wires. (See Cleaning the corona wires.) |
| • | It is a good idea to keep a new toner cartridge ready for use when you see the Toner Low warning. |
| • | To ensure high quality printing, we recommend that use only Genuine Brother Brand toner cartridges. When you want to buy toner cartridges, please call your Brother dealer. |
| • | We recommend that you clean the machine when you replace the toner cartridge. See Routine maintenance. |
| • | If you change the print density setting for lighter or darker printing, the amount of toner used will change. |
| • | Wait to unpack the toner cartridge until immediately before you put it into the machine. |
Toner Low Prepare... |
Replace Toner |
| 1 | Turn off the machine. Unplug the power cord from the electrical socket. | ||||||
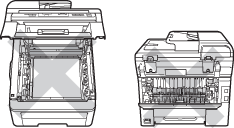
| 2 | 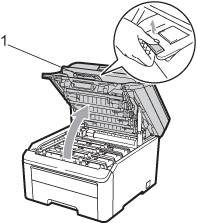 | ||||||
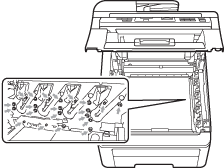
| 3 | Take out the drum unit and toner cartridge assembly for the colour shown on the LCD. 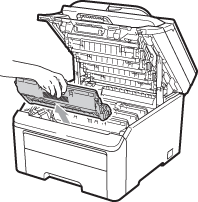 | ||||||
| 4 | 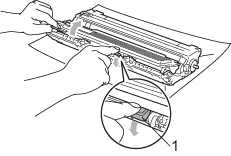
| ||||||
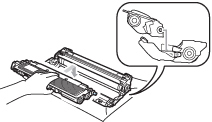
| 5 | Clean the primary corona wire inside the drum unit by gently sliding the green tab from left to right and right to left several times. 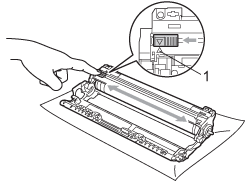 | ||||||
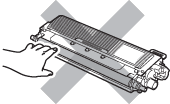
| 6 | Unpack the new toner cartridge. Gently shake it from side to side several times to distribute the toner evenly inside the cartridge.  | ||||||
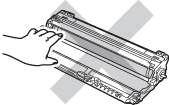
| 7 | Pull off the protective cover. 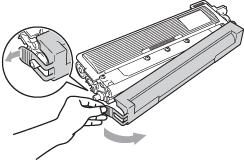 | ||||||
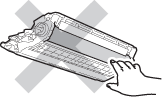
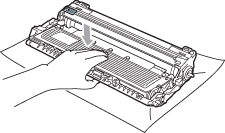
| 8 | Put the new toner cartridge firmly into the drum unit until you hear it lock into place. | ||||||
| 9 | Slide the drum unit and toner cartridge assembly into the machine. Make sure that you match the toner cartridge colour to the same colour label on the machine. 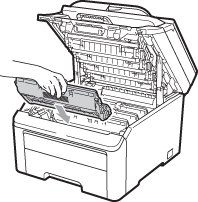 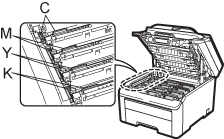 C-Cyan M-Magenta Y-Yellow K-Black | ||||||
| 10 | Close the top cover of the machine. 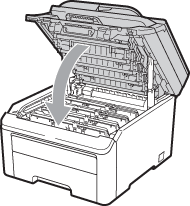 | ||||||
| 11 | Plug the machine’s power cord back into the electrical socket first, and reconnect all cables. Turn on the machine. |