MFC-J6720DW
FAQs & Troubleshooting |
I am experiencing problems sending a fax.
- If you want to know how to send a fax, click here.
- If you are only having problems sending faxes to one particular number, click here.
- If you are seeing the message NG or Poor Line Condition when sending faxes, click here.
- If you are seeing the message Comm. Error or Communication Error when sending faxes, click here.
If you are having problems sending faxes, follow these steps:
-
If you are only having problems sending faxes outside your area code, make sure you have long-distance service on your telephone line.
If you do not have long-distance service, you will not be able to send long-distance faxes.
- If you are having problems sending faxes inside and outside your area code, go to Step 2.
-
Is your telephone service bundled with your Internet or cable service, or do you have to connect your telephone to a modem?
-
If yes, click here to see using VOIP and have problems.
VoIP is a type of phone system that uses an Internet connection instead of a traditional phone line.
-
If no, are you using MagicJack?
- If yes, click here to see using MagicJack and have problems.
- If no, go to Step 3.
-
If yes, click here to see using VOIP and have problems.
-
Verify information is displayed on the the machine's display (hereinafter called LCD). .
- If the LCD displays the Home screen, go to Step 4.
-
If the LCD displays a menu screen, follow these steps:
-
Press
 (Home).
 - Go to Step 4.
-
Press
- If the LCD displays an error message (for example, Paper Jam) or status message (for example, Replace Ink), refer to the solution that addresses the message.
-
If the LCD is blank, follow these steps:
-
Touch the LCD to make sure the machine isn't in Sleep Mode.
- If the LCD is no longer blank, go to Step 4.
- If the LCD is still blank, go to Step b.
-
Press
 on your Brother machine's control panel to verify the machine is powered on.
- If your machine is off, its LCD will be blank.
-
Do one of the following:
- If the LCD is no longer blank, go to Step 4.
- If the LCD is still blank, go to Step d.
-
Verify the Brother machine's power cord is directly connected from the Brother machine to the power outlet.
- If the Brother machine's power cord is directly connected to the power outlet, go to Step e.
-
If the Brother machine's power cord is connected to a surge protector or power switch, follow these steps:
- Remove the Brother machine's power cord from the surge protector or power switch.
- Plug the Brother machine's power cord directly into the power outlet.
- Go to Step e.
-
Do one of the following:
- If the LCD is no longer blank, go to Step 4.
- If the LCD is still blank, go to Step f.
-
Connect the machine to a different, known-working power outlet.
-
Do one of the following:
- If the LCD is no longer blank, go to Step 4.
- If the LCD is still blank after you connect the machine to another known-working outlet, please contact Brother Customer Service from "Contact Us."
-
Touch the LCD to make sure the machine isn't in Sleep Mode.
-
Make sure the machine has a dial tone. Click here to see how to verify if the Brother machine has a dial tone.
- If there is a dial tone, go to Step 6.
-
If there is no dial tone, verify the telephone cord is directly connected from the jack labeled LINE on the Brother machine to the wall telephone jack.
If there are splitters, commshare devices, power strips, or surge protectors between the wall jack and the Brother machine, remove them. Removing these devices helps determine if the missing dial tone is related to the Brother machine or another device on the line.- If the line connection did not require any changes, go to Step 5.
- If the line connection required a correction, go to Step a.
-
Press
 (Fax)
(Fax)
. -
Do one of the following:
-
If
 (Sending Faxes) appears on the LCD, press it.
 -
If
 (Sending Faxes) does not appear on the LCD, go to Step c.
-
If
-
Press Hook.
-
Listen for a dial tone.
- Press Hook.
-
Press
 (Home).
- If there is a dial tone, go to Step 6.
- If there is still no dial tone, go to Step 5.
Brother strongly recommends you connect your machine to a surge protector to protect it against power surges and lightning. In particular, we suggest you use a surge protector that is compatible with both standard AC power cords and telephone cords. Surge protectors equipped with telephone jacks will help to insulate your machine from power surges that might travel through the telephone line.
-
Test the wall jack with a known-working telephone, or test the Brother machine on a different, known-working wall jack.
-
Do you have a known-working telephone that you can use to test the line?
- If you have a known-working telephone on hand, go to Procedure A: Testing the wall jack with a telephone.
- If you do not have a known-working telephone on hand, go to Procedure B: Testing the brother machine on a different wall jack.
- Remove the telephone cord from the wall jack.
- Use a known-working telephone cord to connect a known-working extension telephone to the same wall jack.
- Lift the telephone's handset.
- Listen for a dial tone.
-
Hang up the telephone's handset.
- If the telephone does not have a dial tone, the issue is related to the phone line or wall jack. You must contact your local telephone company for assistance.
- If the telephone has a dial tone, go to Step vi.
- Disconnect the telephone cord from the telephone.
- Directly connect the telephone cord to the jack labeled LINE on the Brother machine.
- Go to Step b.
- Remove the telephone cord from the Brother machine.
- Directly connect a known-working telephone cord from the jack labeled LINE on the Brother machine to a different, known-working wall telephone jack.
- Go to Step b.
-
Check for a dial tone. Click here to see how to verify if the Brother machine has a dial tone.
- If there is a dial tone, go to Step 6.
- If there is no dial tone, please contact Brother Customer Service from "Contact Us."
-
Do you have a known-working telephone that you can use to test the line?
-
Do one of the following:
- If you are not using a DSL line, go to Step 7.
- If you are using a DSL line, follow these steps:
If you are unable to perform the troubleshooting steps listed below, contact your DSL provider for assistance.
- Turn off the DSL modem or disconnect its power supply.
- Disconnect the DSL modem from the telephone line filter.
- Remove the filter from the wall telephone jack.
- Directly connect your Brother machine to the wall telephone jack.
- Go to Step 7.
-
Do one of the following:
- If you are trying to send a fax using the Automatic Document Feeder (ADF), click here.
- If you are trying to send a fax using the flat scanner glass, click here.
To send a fax from the ADF, follow these steps:
NOTE: Illustrations shown below are from a representative product and may differ from your Brother machine.-
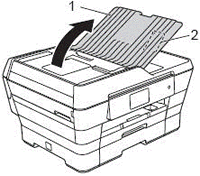
Open the ADF Document Support (1) and the ADF Document Output Support Flap (2).
Place the document(s) you want to send into the ADF face up, top edge first until you feel it touch the roller. -
-
Insert the document underneath the paper guides (1).
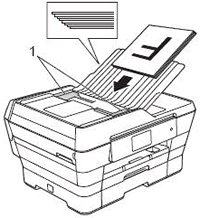
- After you put your document(s) in the ADF, the Brother machine's LCD should display ADF Ready.
-
Insert the document underneath the paper guides (1).
-
Do one of the following:
- If the LCD displays ADF Ready, go to Step e.
- If the LCD continues to display the Home screen or a menu screen, go to Step d.
-
Make sure the document is between 5.8 and 11.7 inches wide and 5.8 and 17 inches long. If the document is fewer than 5.8 inches wide, the document sensors will not detect it. You will need to use a wider sheet of paper.
- If the LCD displays ADF Ready, go to Step e.
- If the document meets the above-listed specifications and the LCD continues to display the Home screen or a menu screen when you place a document into the ADF please contact Brother Customer Service from "Contact Us."
-
Press
 (Fax).
 -
Do one of the following:
-
If
 (Sending Faxes) appears on the LCD, press it.
 -
If
 (Sending Faxes) does not appear on the LCD, go to Step g.
-
If
-
Dial a known-working fax number.
-
You can use the dial pad to manually dial the number, press
 (Address Book) to use the Address Book, or press
  (Call History) to use the Outgoing or Incoming Call History.
 -
If you are using access numbers for calling cards or long-distance security codes, or if you must press 9 to access an outside line and a pause is required between the dialing of those numbers and the fax number, be sure to press Pause when needed.
- Pressing Pause will insert a 3.5-second pause between numbers.
-
You can press Pauseas many times as needed to increase the length of the pause.
Redial will turn into Pause after you dial the number.
-
You can use the dial pad to manually dial the number, press
-
Do one of the following:
-
To send a black and white fax, follow these steps:
When manually sending a fax by pressing Hook to listen for a dial tone before dialing, make sure you wait until you hear the receiving machine's fax tones before you press Fax Start on the Brother machine.
-
Press Fax Start.
The machine will send the fax. - Go to Step 8.
-
Press Fax Start.
-
To send a color fax, follow these steps:
- Press Options.
- Swipe up or down, or press the Up or Down arrow key to display Color Setting.
- Press Color Setting.
-
Press Color.
When manually sending a fax by pressing Hook to listen for a dial tone before dialing, make sure you wait until you hear the receiving machine's fax tones before you press Fax Start on the Brother machine.
- Press OK.
- Press Fax Start.The machine will send the fax.
- Go to Step 8.
-
To send a black and white fax, follow these steps:
To send a fax using the flat scanner glass, follow these steps:- You cannot send multipage color faxes from the flat scanner glass.
- You can send documents up to Letter or A4 size.
- Since you can only scan one page at a time on the flat scanner glass, it is easier to send multipage faxes using the ADF.
- The ADF must be empty when you are faxing from the flat scanner glass.
NOTE: Illustrations shown below are from a representative product and may differ from your Brother machine.-
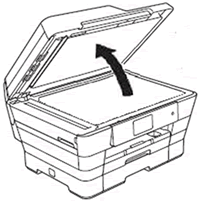
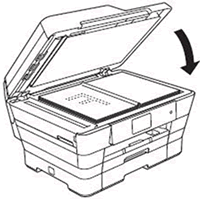
Lift the document cover.
-
Place the document face down in the upper-left corner of the flat scanner glass.
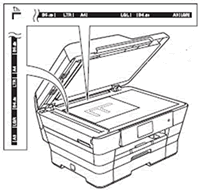
- Use the guide lines on the upper-left corner of the scanner glass to help you position the document.
-
Close the document cover.
-
Press
 (Fax).
 -
Do one of the following:
-
If
 (Sending Faxes) appears on the LCD, press it.
 -
If
 (Sending Faxes) does not appear on the LCD, go to Step f.
-
If
-
Dial a known-working fax number.
-
You can use the dial pad to manually dial the number, press
 (Address Book) to use the Address Book, or press
  (Call History) to use the Outgoing or Incoming Call History.
 -
If you are using access numbers for calling cards or long-distance security codes, or if you must press 9 to access an outside line and a pause is required between the dialing of those numbers and the fax number, be sure to press Pause when needed.
- Pressing Pause will insert a 3.5-second pause between numbers.
-
You can press Pause as many times as needed to increase the length of the pause.
Redial will turn into Pause after you dial the number.
-
You can use the dial pad to manually dial the number, press
-
Do one of the following:
-
To send a black and white fax, follow these steps:
-
Press Fax Start.
- The machine will scan the page.
- The LCD will read Next page?
-
Do one of the following:
-
To send a single-page fax, press No.
The machine will send the fax. - To send more than one page, go to Step iii.
-
To send a single-page fax, press No.
- Press Yes.
- Place the next page on the scanner glass.
-
Press OK.
- The machine will scan the page.
- To scan additional pages, repeat Steps iii through v.
-
When you have scanned all the pages you want to send, press No.
The machine will send the fax.
- Go to Step 8.
-
Press Fax Start.
-
To send a color fax, follow these steps:
- Press Options.
- Swipe up or down, or press the Up or Down arrow key to display Color Setting.
- Press Color Setting.
- Press Color.
- Press OK.
- Press Fax Start.
-
Press Yes.
The machine will send the fax. - Go to Step 8.
-
To send a black and white fax, follow these steps:
-
Do one of the following:
- If the fax is successful, the issue is resolved.
- If the fax is not successful, go to Step 9.
-
Change the Brother machine's Compatibility to Basic (for VoIP):
-
Press
 (Settings).
 - Press All Settings.
- Swipe up or down, or press the Up or Down arrow key to display Initial Setup.
- Press Initial Setup.
- Swipe up or down, or press the Up or Down arrow key to display Compatibility.
- Press Compatibility.
- Press Basic (for VoIP).
-
Press
 (Home).
When you change the Compatibility to Basic (for VoIP), the Error Correction Mode (ECM) feature is only available for color fax sending.
-
Press
-
Send another test fax.
- For information about sending a test fax, refer to Step 7.
-
Do one of the following:
- If the fax is successful, the issue is resolved.
- If you are using DSL and the fax is successful, contact your DSL provider for assistance in resolving the interference from the DSL system.
- If the fax is not successful, the problem is likely related to the telephone line or to something in your setup, such as other interfering devices, incorrect connections, or unknown phone-company features. We recommend that you contact your telephone service provider and double-check your setup using this FAQ.