QL-720NW
FAQs & Troubleshooting |
How do I install the software from the CD-ROM? (for Mac)
- You can download and install the latest version of the software from the [Downloads] section of this website.
-
For macOS11 or later:
You can print from AirPrint or P-touch Editor without the printer driver installation. Download the latest version of P-touch Editor from the [Downloads] section of this website and edit from it.
To install the software from the CD-ROM, follow the steps below:
> For wired network interface users (QL-720NW only)
> For wireless network interface users
-
Insert the installer CD-ROM into your computer's CD-ROM drive.
-
Double-click the [Start Here OSX] icon.

Available items:
Start Here OSX
Installs P-touch Editor 5.0, P-touch Update Software and the Printer Driver.Utilities
Includes BRAdmin Light and the Wireless Device Setup Wizard.Documentation
Includes the User's Guide, Software User's Guide and Network User's Guide.Brother Support
Displays the link to On-Line Registration and Brother support website. -
Follow the on-screen instructions.
-
After the installation is completed, press the ON/OFF button of the machine to turn on the power.
- Click [Apple menu] - [System Preferences] - [Print & Fax] / [Print & Scan] / [Print & Scanners].
-
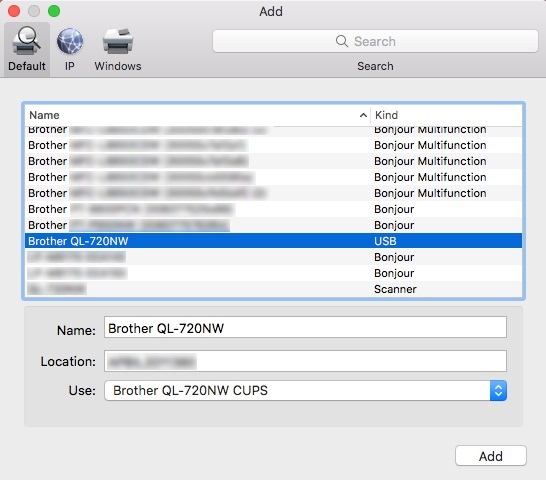
Click the [+] button.
- Click the [+] button and choose "Brother [model name]" from the list, and then click [Add] to add the printer.
<For wired network interface users (QL-720NW only)>
-
Insert the installer CD-ROM into your computer's CD-ROM drive.
-
Double-click the [Start Here OSX] icon.

Available items:
Start Here OSX
Installs P-touch Editor 5.0, P-touch Update Software and the Printer Driver.Utilities
Includes BRAdmin Light and the Wireless Device Setup Wizard.Documentation
Includes the User's Guide, Software User's Guide and Network User's Guide.Brother Support
Displays the link to On-Line Registration and Brother support website. -
Follow the on-screen instructions.
- Click [Apple menu] - [System Preferences] - [Print & Fax] / [Print & Scan] / [Print & Scanners].
-
Choose "Brother [model name]" from the list and click [Add] to add the printer.

-
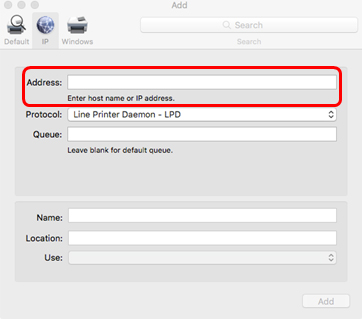
Choose IP from the [Protocol:] pull-down menu.
Enter the IP address of the printer into the Address box.
Choose "Brother [model name]" from the list and click [Add] to add the printer.

<For wireless network interface users>
-
Insert the installer CD-ROM into your computer's CD-ROM drive.
-
Double-click the [Utilities] folder, and then click [Wireless Device Setup Wizard].


-
Choose [Yes, I have a USB cable to use for installation], and then click [Next].

-
Temporarily connect the USB cable directly to the computer and the printer and then click [Next].

-
The wizard will search for wireless network available from your printer.
Choose the SSID and click [Next].

-
If the list is blank, check that the access point is turned on and is broadcasting the SSID, and then see if the printer and the access point are within range for wireless communication.
Then click [Refresh]. -
If your access point is set not to broadcast the SSID, you can enter the SSID manually by clicking the [Advanced] button.
Follow the on-screen instructions for entering the Name (SSID), and then click [Next].
-
If the list is blank, check that the access point is turned on and is broadcasting the SSID, and then see if the printer and the access point are within range for wireless communication.
-
Enter the Network Key and then click [Next].

If your network is not configured for authentication and encryption, the ATTENTION! screen will appear.
To continue configuration, click [OK]. -
Confirm the wireless network settings and then click [Next].
The settings will be sent to your printer. -
Disconnect the USB cable connecting the computer and the printer and the click [Next].
-
Choose the printer from the list, and then click [Next].
-
If your wireless settings fail, the [Wireless Device Setup Wizard] screen appears.
Follow the on-screen instructions to complete the wireless configuration. - If you are using WEP but your printer is not found, make sure you entered the WEP key correctly.
-
If your wireless settings fail, the [Wireless Device Setup Wizard] screen appears.
-
The installation of the Brother drivers will automatically start.
When the screen for the online user registration is displayed, click [OK] or [Cancel]. - Click [Finish].
