CS-8072
FAQs & Troubleshooting |
UPPER THREADING

Be sure to thread the machine properly.
Improper threading can cause the thread to tangle and break the needle, leading to injury.
When threading the sewing machine, be sure that one of the presser feet mentioned in this Operation Manual is installed.
-
Raise the presser foot lever. (If the presser foot is not raised, the upper thread cannot be threaded.)
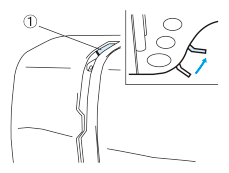
(1) Upper threading shutter
In order to ensure that the upper threading is done correctly, this sewing machine is equipped with an upper threading shutter which prevents upper threading or needle threading while the presser foot is lowered.
-
Press the "NEEDLE POSITION" button to raise the needle.

-
Place the spool of thread on the spool pin so that the thread comes from the front of the spool.

-
If the thread spool and/or spool cap are set incorrectly, the thread may tangle on the spool pin and cause the needle to break.
-
Use the spool cap (large or small) that is closest in size to the thread spool.
If a spool cap smaller than the thread spool is used, the thread may become caught in the slit on the end of the spool and cause the needle to break.
-
If the thread spool and/or spool cap are set incorrectly, the thread may tangle on the spool pin and cause the needle to break.
-
While holding the end of the thread with your left hand, pass the thread through the guides in the order shown by the numbers.

-
If the thread is pushed down at 1 to make it taut, it can be passed around the other thread guides more easily.
- Incorrectly feeding the thread will result in faulty sewing.
-
If the thread is pushed down at 1 to make it taut, it can be passed around the other thread guides more easily.
-
Lower the presser foot.
(A) Threading the take-up lever 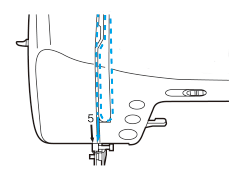
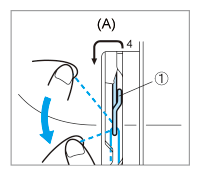
(1) Thread take-up lever -
Guide the thread through the needle clamp thread guide.
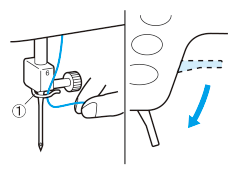
(1) Needle clamp thread guide
-
When using the auto-threading device, gently pull the thread towards you.
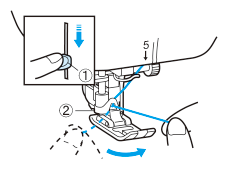
(1) Needle threader lever
(2) Guide (Large hook)* Lowering the presser foot will engage the automatic tension and will allow you to grip the thread as you proceed.
-
Lower the needle threader lever all the way down using your left index finger.
Check that the thread is held by the guide (large hook) and that the third hook on the needle threader has passed through the eye of the needle.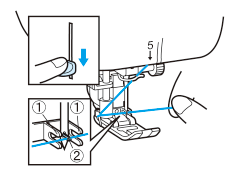
(1) Second set of hooks
(2) Third hook -
As you lower the needle threader lever, pull the thread to the left and catch it on the large hook.
When the needle threader lever is in the lowest position, pull the thread in front of the needle’s eye and catch it on the third hook.* Rotate your right hand slightly to check that the thread is engaged.
-
While gently holding the thread, raise the needle threader lever.

-
Pull the thread towards the rear to finish the upper threading.

The needle threader lever can only be used with home sewing machine needles size 75/11 - 100/16.
Check the table on page 26 for appropriate needle and thread combinations.
Note that, if you are using transparent nylon mono-filament thread, only needles in the range of 90/14 - 100/16 can be used.
-
Pass the thread underneath the presser foot and pull it out from the rear of the machine by about 50 mm (2 inches).
* You do not need to pull the bobbin thread up before you start sewing.
Always raise the presser foot before removing the upper thread from the machine or damage may occur to the tension unit.
The needle threader lever can not be used to thread the needle when you are using decorative threads or specialty needles like the twin needle and wing needle.
When using those types of threads or needles, thread the eye of the needle manually.
Make sure the main power switch is OFF when threading the needle manually.
