HL-1270N
FAQs & Troubleshooting |
Replace the toner cartridge.
Do NOT use flammable substances or any type of spray to clean the inside or outside of the machine. Doing this may cause a fire or electrical shock.

For the order number (Order No.) of the toner cartridge, please refer to the User's guide provided with your Brother Printer or the Consumables & Options page of your model on Brother Solutions Center. To visit Consumables & Options page, click your model name link (e.g. HL-XXXX * ) on the top section and then click "Consumables & Options" link on the opened page. * XXXX stands for your model name.
The Brother machine has separate consumables for the toner cartridge and the drum unit. Verify you replace only the Toner Cartridge and not the drum unit. If you want to know their difference, refer to "What is the difference between the toner cartridge and the drum unit?"
Follow the procedure below to replace toner cartridges.
- Open the front cover. Pull out the drum unit assembly.

- It is recommended that you put the drum unit assembly on a piece of disposable paper or cloth in case of accidental toner spill or scatter.
- Do not touch the electrodes shown below to prevent damage to the printer cause by static electricity.

- Place the drum unit assembly containing the old toner cartridge on a flat, horizontal surface, and pull the toner cartridge out of the drum unit assembly while pushing the lock lever down with your right hand.

- Unpack the new toner cartridge, gently rock it from side to side 5 or 6 times keeping in horizontal.

- Remove the protective cover.

- Only unpack the toner cartridge immediately before you need to install it into the printer. If toner cartridges are left unpacked for a long period of time, the toner life is shortened.
- If an unpacked drum unit is subjected to excessive direct sunlight or room light, the unit may be damaged.
- Use a Brother genuine toner cartridge which is specially formulated to ensure high print quality.
- Printing with third party consumables may reduce not only the printing quality but also the quality and life of the printer itself. It may also cause serious damage to the performance and life of a genuine Brother drum unit. Warranry coverage does not apply to problems caused by the use of third party consumables.
- Install the toner cartridge immediately after you remove the protective part shown below.

- Install the new toner cartridge into the drum unit until it locks into place, indicated by a click. When the toner cartridge is installed correctly, the lock lever is lifted automatically.
Make sure that the toner cartridge is installed correctly, or the toner cartridge may separate from the drum unit when you hold the drum unit assembly.

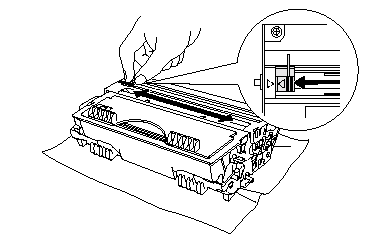
- Clean the primary corona wire inside the drum unit by gently sliding the blue tab to the right end and left end several times. Return the tab to the home position before reinstalling the drum unit assembly.
Make sure that you return the tab to the home position before reinstalling the drum unit assembly into the printer or printed pages may have vertical stripes.

- Re-install the drum unit assembly into the printer and close the front cover.

