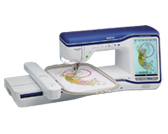
Innov-is XV8500D
FAQs & Troubleshooting |
How do I use the Multi-function foot controller?
With the multi-function foot controller, various sewing machine operations in addition to starting/stopping sewing, such as thread cutting and reverse stitching, can be specifi ed to be performed. In addition, the large and small pedals can be installed on either the left or right side to suit your preference.
Assembling the Multi-Function Foot Controller
Supplied Items

| No. | Part Name |
|---|---|
| 1 | Main foot controller |
| 2 | Side pedal |
| 3 | Mounting plate |
| 4 | Mounting screw × 2 |
Assembling the Controller
-
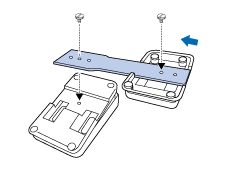
Align the wide side of the mounting plate with the notch in the bottom of the main foot controller, and then secure them together with a screw. Feed the other side of the mounting plate into the notch on the bottom of the side pedal, and then secure them together with a screw.
-
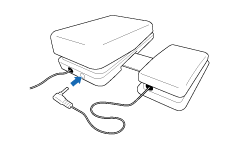
Insert the plug for the side pedal into the jack at the back of the main foot controller.
-
Insert the plug for the main foot controller into the foot controller jack on the right side of the machine.
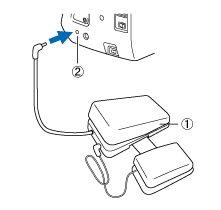
(1) Multi-function foot controller
(2) Foot controller jack
Adjusting the Pedal Positions
The pedal spacing can be adjusted depending on the screw holes used in the mounting plate. The pedal spacing is the widest when the pedals are attached using the outermost screw holes (1); the pedal spacing is the narrowest when they are attached using the innermost screw holes (2).
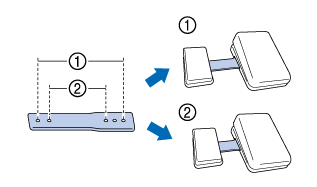
- The side pedal may be attached on the right or left side of the main foot controller.
- For greater distance you always have the option of not connecting the side pedal and main foot controller using the mounting plate, making sure that both pedals are connected using the jack from the side pedal to the main foot controller.
Using the Multi-Function Foot Controller
You can also use the foot controller to start and stop sewing.
Do not allow fabric pieces and dust to collect in the foot controller. Doing so could cause a fire or an electric shock.
- When the multi-function foot controller is being used, you cannot start sewing by pressing the "Start/Stop" button.
- The multi-function foot controller cannot be used when embroidering.
- The multi-function foot controller can be used for sewing utility and decorative stitches when the embroidery unit is attached.
Using the Controller
-
Insert the multi-function foot controller plug into its jack on the machine.
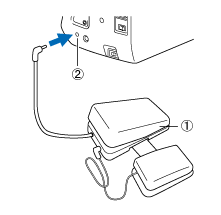
(1) Multi-function foot controller
(2) Foot controller jack -
Slowly depress the multi-function foot controller to start sewing.
Pressing down on the multi-function foot controller increases the sewing speed; releasing the pressure on the multi-function foot controller decreases the sewing speed.
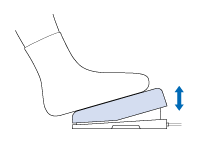
The speed that is set using the sewing speed controller is the multi-function foot controller's maximum sewing speed.
- Release the multi-function foot controller to stop the machine.
Specifying the functions that are performed by the multi-function foot controller
With the multi-function foot controller, various sewing machine operations in addition to starting/stopping sewing, such as thread cutting and reverse stitching, can be specified to be performed.
Functions That Can Be Specified
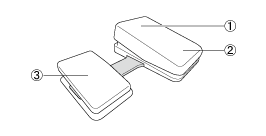
| No. | Controller | Functions that can be specified |
|---|---|---|
| 1 | Main foot controller | Start/Stop |
| 2 | Heel switch |
Select any of the following:
|
| 3 | Side pedal |
* Reverse Stitch (Reinforcement Stitch):
- If you set the "Reverse Stitch" function on the heel switch, machine operates the same as pressing the "Reverse Button" on the machine.
- Reinforcement stitching may be applied depending on the selected stitch pattern.
If you set "Reverse Stitch" on the side pedal, you can create a darning stitch effect using zigzag stitches. With both feet, keep pressing the main foot controller, and repeat pressing and releasing the side pedal to sew forward and reverse in turn. Machine will reverse at the speed you press the main foot controller.
Specifying the Functions
The functions performed by the multi-function foot controller can be specified in the settings screen.
- Before specifying the functions, connect the multi-function foot controller to the sewing machine. The settings screen is activated the first time that the sewing machine detects the multi-function foot controller.
- After the multi-function foot controller is connected to the sewing machine and the functions are specified, the "Start/Stop" button cannot be used. All buttons other than the "Start/Stop" button can continue to be used.
-
Press
 (Machine Setting Mode Key) to display the Settings screen.
-
Display page 2 of the Sewing Settings screen.
-
Select the functions to be performed by the multi-function foot controller.
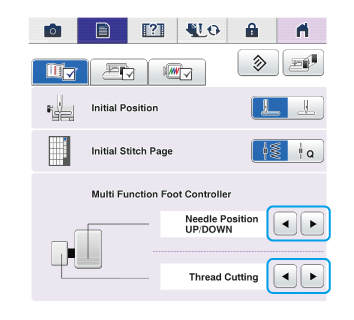
* You can activate this setting after connecting the multi-function foot controller. (These settings are not operable unless the multi-function foot controller is attached to the machine.)
- Press OK key.
