PT-E800T
FAQs & Troubleshooting |
How do I clean / maintain my printer?
We recommend cleaning your printer on a regular basis to maintain its correct performance and life span.
Always remove the battery and disconnect the AC adapter before cleaning the printer.
Replacing or Cleaning the Tube Cutter and Tube Cutter Board
Replacing the Platen Roller and Conveyance Rollers for Tubes
For E800TK, E850TKW only
Replacing the Coin Cell Battery
Wipe any dust and marks from the main unit using a soft, dry cloth.
Use a slightly dampened cloth on difficult to remove marks.
Do not use paint thinner, benzene, alcohol or any other organic solvent. These may deform the case or damage the appearance of your printer.
Cleaning the Print Head
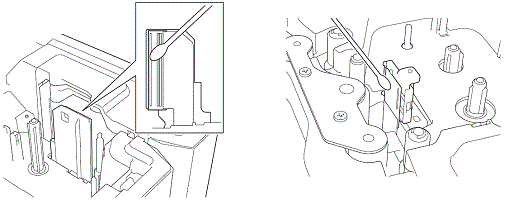
Streaks or poor quality characters on printed labels (or tube) generally indicate that the print head is dirty.
Clean the print head using a cotton swab moistened with ethanol or the optional print head cleaning cassette (TZe-CL6 for label print head only).
|
|
|
|
Print head for labels |
Print head for tubes |
Do not touch the print head directly with your bare hands. The print head may be hot.
See the instructions provided with the print head cleaning cassette for directions on how to use it.
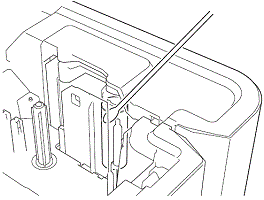
Cleaning the Label Roller
If the quality of the printed characters on the labels is poor even after cleaning the print head, clean the entire label roller with a dry cotton swab by moving the swab up and down while rotating the roller.
Cleaning the Tape Cutter Unit
Tape adhesive can build up on the cutter blades after repeated use, dulling the blades, which may result in the tape jamming.
About once every year, wipe the cutter blades using a dry cotton swab.
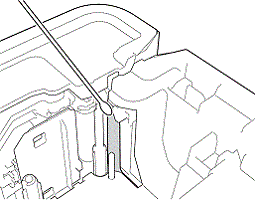
Do not touch the cutter blades directly with your bare hands.
Cleaning the FLe Sensor
If the FLe sensor is dirty, FLe labels cannot be positioned correctly. Wipe the sensor using a cotton swab moistened with ethanol.
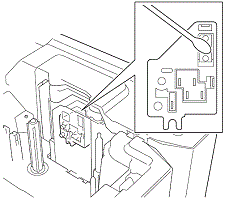
Replacing or Cleaning the Tube Cutter and Tube Cutter Board
After repeated use of the tube cutter, tubes may jam if materials attach to the cutter blade and take the edge off the blade. Clean the blade using a cotton swab or similar item or replace the tube cutter. (PA-TC-001 for the tube cutter and tube cutter board)
-
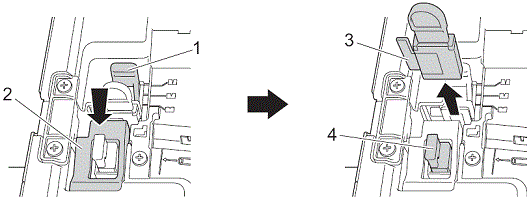
Move the tube half-cut adjuster (1) rearward to align it with the "
 " mark as shown in the illustration.
While pushing down on the black part (2), grab the tube cutter board (3) and pull it upward to remove it.
Remove the tube cutter (4) using the same procedure.
- To clean the tube cutter blade, push the black portion shown in the illustration so that the blade protrudes from the tube cutter, and then wipe the blade with a cotton swab or similar item.
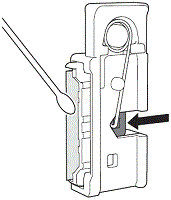
- Because the black portion is spring operated, be careful that your hand does not slip and contact the blade.
- Do not touch the cutter blade directly with your bare hands.
- Install the tube cutter and tube cutter board in their original positions.
Replacing the Tube Cleaner
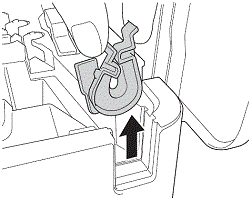
After repeated use, the sponge may become worn and dirty, causing poor-quality printed characters. Grab the tube cleaner as shown in the illustration, pull it upward to remove it, and then replace it. (PA-CL-001)
Replacing the Platen Roller and Conveyance Rollers for Tubes
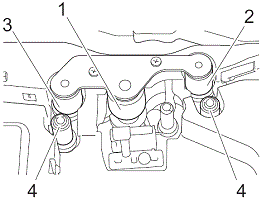
After repeated use, the rollers may become dirty and the rubber may become worn, causing poor-quality printed characters. Remove and replace the rollers.
- PA-RL-001 for the platen roller
- PA-RL-002 for conveyance roller A
- PA-RL-003 for conveyance roller B
- To replace the conveyance nip rollers, contact your Brother dealer or Brother Customer Service for assistance.
|
1 Platen roller 2 Conveyance roller A 3 Conveyance roller B 4 Conveyance nip rollers |
-
Press the cover open button to open the top cover.
-
Pull the tube release lever up.
-
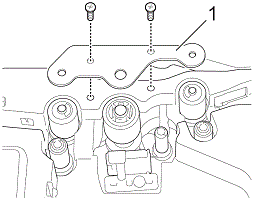
Remove the two screws, and then remove the roller cover (1).
-
Remove a roller you want to replace by pulling it out, and then install a new roller, making sure the gears mesh correctly.
- Install the roller cover so that the projections on the rollers fit into the holes in the cover, and then install and tighten the two screws.
Replacing the Coin Cell Battery
A coin cell battery is used as a back-up power supply to maintain the settings for the internal clock of the keyboard LCD unit. The battery will be consumed even if the printer is not used for a long period of time.
- Use only recommended batteries in the printer. Other batteries may cause damage to the printer.
- Dispose of the batteries at an appropriate collection point, not in the general waste stream. In addition, be sure to observe all applicable federal, state, and local regulations.
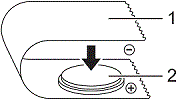
- When storing or discarding the battery, wrap it (for example with cellophane tape) to prevent it from short-circuiting.
|
|
|
1 Cellophane tape 2 Coin cell battery |
- We recommend replacing the battery every 2 years.
- If the clock is reset while power is supplied to the printer, replace this battery. When replacing the battery, buy a CR2032 battery (recommended manufacturers: Hitachi Maxell, Ltd., FDK Corporation).
-
Press and hold the
 (Power) button to turn the printer off, and then disconnect the printer from the electrical socket. If the rechargeable Li-ion battery is installed, remove the rechargeable battery.
-
Press the cover open button to open the top cover.
-
Using a coin or similar object, slowly turn the coin cell battery cover in the direction of the arrow on the battery cover until it stops, and then remove the coin cell battery cover.
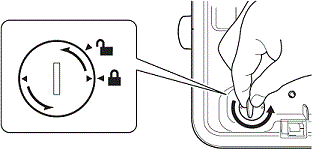
If the coin cell battery cover is forcibly turned past the stop position, it may become damaged.
-
Remove the battery.
As shown below, press part A of the battery so that it can be removed.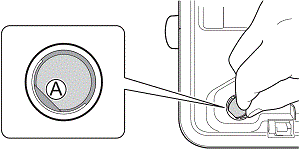
-
Install the new battery.
Be sure to insert the new battery with the + and – sides facing the correct direction.
-
Return the coin cell battery cover to its original position. To install the coin cell battery cover, use a coin or similar object to slowly turn the coin cell battery cover in the opposite direction of the arrow on the battery cover until it stops.

If the coin cell battery cover is forcibly turned past the stop position, it may become damaged.
- Close the top cover.
Movie: How do I clean / maintain my printer?
*The video clip is being streamed from YouTube.
